No edit summary |
|||
| Line 20: | Line 20: | ||
[[File:DMXC3L03 projectExplorer.JPG]] | [[File:DMXC3L03 projectExplorer.JPG]] | ||
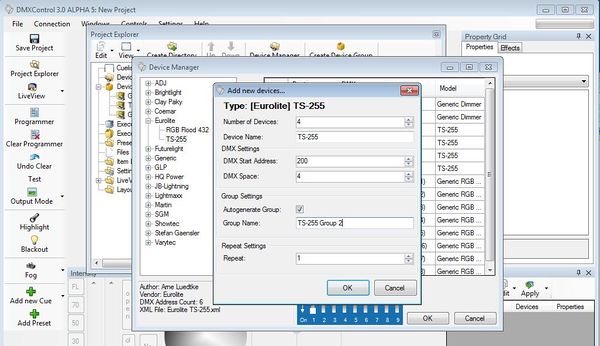
In following step we will create 4 moving lights of type "TS-255". You have to fill in the requested data. Please pay attention to define the | In following step we will create 4 moving lights of type "TS-255". You have to fill in the requested data. Please pay attention to define the correct start addresses. | ||
[[File:DMXC3L03 createDevice.JPG|600px]] | [[File:DMXC3L03 createDevice.JPG|600px]] | ||
By setting the hook for "autogenerate group" an group element is created automatically containing all devices of this definition step. | By setting the hook for "autogenerate group" an group element is created automatically containing all devices of this definition step. | ||
You can also create "user defined groups". Therefore you have to select the devices (e.g. in project explorer or in LiveView") and to press the "Create Device Group" button. Renaming of groups (and other items) also can be made within the project explorer. | |||
By right mouse click the property menu for each item appears. Here you can set additional properties such as "device id", "enabled flag" etc. | |||
'''topics to be added (by beta tester)''' | '''topics to be added (by beta tester)''' | ||
* work with DDF - Wie erzeugen? | * work with DDF - Wie erzeugen? | ||
* | * | ||
| Line 36: | Line 36: | ||
==Exercise== | ==Exercise== | ||
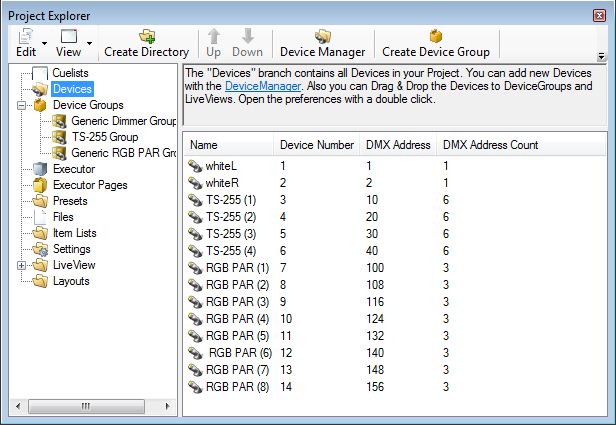
* create all devices as shown in the figure above: 4 TS-255, 8 generic dimmer (as front lights) and 8 RGB-PARs | * create all devices as shown in the figure above: 4 TS-255, 8 generic dimmer (as front lights) and 8 RGB-PARs | ||
* | * create two additional groups: all devices on left hand side and all devices on right hand side, rename these groups to "left" and "right" | ||
==Additional links and references== | ==Additional links and references== | ||
Revision as of 16:22, 25 December 2012
{{#tree:id=dmxc3|openlevels=1|root=DMXC 3 lessons|
- preamble
- lesson 1: Installation and configuration
- lesson 2: The GUI panel concept
- lesson 3: Creating and patching fixtures
- lesson 4: The live view panel
- lesson 5: Setting properties with property panels
- lesson 6: Output plugins
- lesson 7: Summery and details - Setting
- lesson 8: Scenes (cues) and scene lists
- lesson 9: Fanning, chasers and other effects
- lesson 10: The programmer view
- lesson 11: Trigger concepts
- lesson 12: Editing scenes and scenelists
- lesson 13: Presets
- lesson 14: Summary and details - Programming
- lesson 15: Working with parallel scene lists
- lesson 16: Softpult
- lesson 17: Artnet
- lesson 18: Multi-media: Beamer tool, Matrix etc.
- lesson 19: Other clients and plugins (Android, iOS, ...
- lesson 20: Create new device definitions
- lesson 21: free topic
- lesson 22: Hints for testers and test reporting
- appendix1: Summary of commands ans shortcuts
- appendix2: Kernel menu tree
}}
Overview
This lesson helps you to understand how to create and patch your fixtures (devices) in DMXControl 3. We will also show, how groups of devices are created (automatically).
Lecture 3: Creating and Patching fixtures
The starting point for creation of devices is the project explorer. Here you can find a tree of directories displaying the equipment such as fixtures, devices, scene lists etc. The administration is intuitive by context menus (right mouse click) or buttons, e.g. for adding or deleting items.
Hint: The project explorer is the central project tree containing all elements of your project. It is primary intended to create and browse your items. For usage in the show programming we refer to "live view" and other tools.
In following step we will create 4 moving lights of type "TS-255". You have to fill in the requested data. Please pay attention to define the correct start addresses.
By setting the hook for "autogenerate group" an group element is created automatically containing all devices of this definition step. You can also create "user defined groups". Therefore you have to select the devices (e.g. in project explorer or in LiveView") and to press the "Create Device Group" button. Renaming of groups (and other items) also can be made within the project explorer.
By right mouse click the property menu for each item appears. Here you can set additional properties such as "device id", "enabled flag" etc.
topics to be added (by beta tester)
- work with DDF - Wie erzeugen?
Exercise
- create all devices as shown in the figure above: 4 TS-255, 8 generic dimmer (as front lights) and 8 RGB-PARs
- create two additional groups: all devices on left hand side and all devices on right hand side, rename these groups to "left" and "right"
Additional links and references
Certificate
I have understood the topics of this lecture and wnt to continue with next course: Lesson 4

