No edit summary |
No edit summary |
||
| Line 5: | Line 5: | ||
{{DMXC3_lesson/en}} | {{DMXC3_lesson/en}} | ||
{{NavigationTop-Tut3 | |||
| zurückLink = Lektion_9_Tut3 | |||
| zurückText = Lektion 9 | |||
| hoch = [[Tutorials DMXControl 3|Inhaltsverzeichnis]] | |||
| vorLink = Lektion_11_Tut3 | |||
| vorText = Lektion 11 | |||
}} | |||
| Line 15: | Line 21: | ||
The programmer is a helpful tool during programming your show. It logs all modifications you have made and shows the current content of the "cue buffer". | The programmer is a helpful tool during programming your show. It logs all modifications you have made and shows the current content of the "cue buffer". | ||
{{BoxHint | |||
| Text= Remember the "save scene" dialog in DMXControl 2. Here you were requested to determine the channels and values before finally saving the cue. The programmer ist a more extended view of this functionality. | |||
}} | |||
Let's illustrate this by an example. We make following actions: | Let's illustrate this by an example. We make following actions: | ||
* at first we open the moving lights shutters and select the color green | * at first we open the moving lights shutters and select the color green | ||
[[File:DMXC3L10 liveviewProgrammer.JPG]] | * secondly, the gobos are set for all devices on "Gobo2" | ||
* thirddly, we set the group of front lights to 50% brightness | |||
[[File:DMXC3L10 liveviewProgrammer.JPG|center]] | |||
{{Bild_mit_Unterschrift |DMXC3L10 liveviewProgrammer.JPG|1|Ansicht des Stage View|center}} | |||
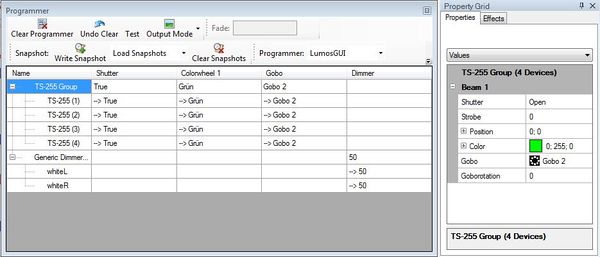
The result is exactly shown in the programmer. Please be aware the the cue is not saved at this point of time, because further modification could follow. | |||
[[File:DMXC3L10 Programmer.JPG|center|600px]] | |||
{{Bild_mit_Unterschrift |DMXC3L10 Programmer.JPG|2|Alle Änderungen der Gerätewerte werden im Programmer angezeigt|center|800px}} | |||
In case you change your mindset on the current cue, you can press the '''Clear''' button in order to remove all settings und refresh the programmer. | |||
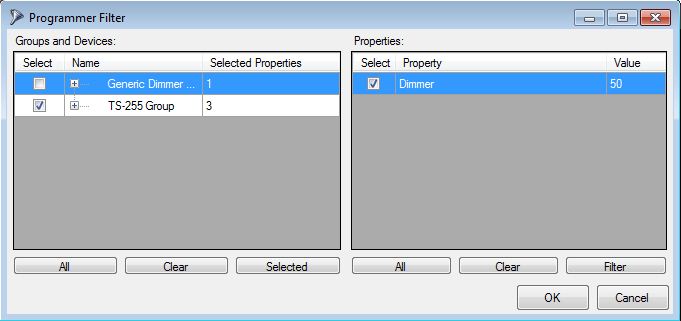
Now you have in the programmer close eye on what values would be stored in the cue. Therefore you are also in the "Programmer filter" that appears before saving the cue, select the desired values. The following example shows the generic dimmers are not yet saved (because we decide they perhaps want to be controled in a separate cue). | |||
{{Bild_mit_Unterschrift |DMXC3L10 ProgrammerFilter.JPG|3|Ansicht des Programmer Filters|center}} | |||
If your cue is OK, then assign to a cue list or an executor by "Add new cue" button - a clear the programmer too (to provide "space" for the next cue). | If your cue is OK, then assign it to a cue list or an executor by "Add new cue" button - a clear the programmer too (to provide "space" for the next cue). | ||
To program more quickly, there is the snapshot function. With it you can cache the latest entries of the programmer and later reload with the drop-down menu in which Load Snapshot is shown. This helps you to program many similar cues with lowest effort. | |||
[[File:DMXC3L10 Programmer.JPG|600px]] | [[File:DMXC3L10 Programmer.JPG|600px]] | ||
Besides, you can also create a filter with '''Set filter''' or delete filters with '''Clear Filter'''. This function is mainly used in output mode. By this tool you can adjust the values of the programmer that are actually spent. If '''All''' is active, all the values in the programmer are sent, at '''Filtered''' only the values that have been activated in the filter. With '''blind''' no values are issued. | |||
[[File:DMXC3L10 ProgrammerFilter.JPG]] | [[File:DMXC3L10 ProgrammerFilter.JPG]] | ||
==Excercise== | ==Excercise== | ||
* Repeat the above scenario | * Repeat the above scenario | ||
==Certificate== | ==Certificate== | ||
| Line 62: | Line 73: | ||
__NOTOC__ | __NOTOC__ | ||
__NOTITLE__ | __NOTITLE__ | ||
{{NavigationTop-Tut3 | |||
| zurückLink = Lektion_9_Tut3 | |||
| zurückText = Lektion 9 | |||
| hoch = [[Tutorials DMXControl 3|Inhaltsverzeichnis]] | |||
| vorLink = Lektion_11_Tut3 | |||
| vorText = Lektion 11 | |||
}} | |||
[[Kategorie:DMXControl 3]] | |||
Revision as of 22:44, 4 January 2013
{{#tree:id=dmxc3|openlevels=1|root=DMXC 3 lessons|
- preamble
- lesson 1: Installation and configuration
- lesson 2: The GUI panel concept
- lesson 3: Creating and patching fixtures
- lesson 4: The live view panel
- lesson 5: Setting properties with property panels
- lesson 6: Output plugins
- lesson 7: Summery and details - Setting
- lesson 8: Scenes (cues) and scene lists
- lesson 9: Fanning, chasers and other effects
- lesson 10: The programmer view
- lesson 11: Trigger concepts
- lesson 12: Editing scenes and scenelists
- lesson 13: Presets
- lesson 14: Summary and details - Programming
- lesson 15: Working with parallel scene lists
- lesson 16: Softpult
- lesson 17: Artnet
- lesson 18: Multi-media: Beamer tool, Matrix etc.
- lesson 19: Other clients and plugins (Android, iOS, ...
- lesson 20: Create new device definitions
- lesson 21: free topic
- lesson 22: Hints for testers and test reporting
- appendix1: Summary of commands ans shortcuts
- appendix2: Kernel menu tree
}} Template:NavigationTop-Tut3
Overview
Here we explain the "programmer view" - a tool that helps to "debug" your show programming.
Lecture 10: The programmer view
The programmer is a helpful tool during programming your show. It logs all modifications you have made and shows the current content of the "cue buffer".
| |
Remember the "save scene" dialog in DMXControl 2. Here you were requested to determine the channels and values before finally saving the cue. The programmer ist a more extended view of this functionality. |
Let's illustrate this by an example. We make following actions:
- at first we open the moving lights shutters and select the color green
- secondly, the gobos are set for all devices on "Gobo2"
- thirddly, we set the group of front lights to 50% brightness
Template:Bild mit Unterschrift
The result is exactly shown in the programmer. Please be aware the the cue is not saved at this point of time, because further modification could follow.
Template:Bild mit Unterschrift
In case you change your mindset on the current cue, you can press the Clear button in order to remove all settings und refresh the programmer.
Now you have in the programmer close eye on what values would be stored in the cue. Therefore you are also in the "Programmer filter" that appears before saving the cue, select the desired values. The following example shows the generic dimmers are not yet saved (because we decide they perhaps want to be controled in a separate cue).
Template:Bild mit Unterschrift
If your cue is OK, then assign it to a cue list or an executor by "Add new cue" button - a clear the programmer too (to provide "space" for the next cue).
To program more quickly, there is the snapshot function. With it you can cache the latest entries of the programmer and later reload with the drop-down menu in which Load Snapshot is shown. This helps you to program many similar cues with lowest effort.
Besides, you can also create a filter with Set filter or delete filters with Clear Filter. This function is mainly used in output mode. By this tool you can adjust the values of the programmer that are actually spent. If All is active, all the values in the programmer are sent, at Filtered only the values that have been activated in the filter. With blind no values are issued.
Excercise
- Repeat the above scenario
Certificate
I have understood the topics of this lecture and want to continue with next course: Lesson 11


