No edit summary |
No edit summary |
||
| Line 6: | Line 6: | ||
{{DMXC3_lesson/en}} | {{DMXC3_lesson/en}} | ||
{{NavigationTop-Tut3 | |||
| zurückLink = Lektion_10_Tut3 | |||
| zurückText = Lektion 10 | |||
| hoch = [[Tutorials DMXControl 3|Inhaltsverzeichnis]] | |||
| vorLink = Lektion_12_Tut3 | |||
| vorText = Lektion 12 | |||
}} | |||
==Overview== | ==Overview== | ||
Cue lists are the best means to control your show. In this lesson we explain how to define the sequence and the flow of scenes by triggers. | |||
==Lecture 11: Trigger in | ==Lecture 11: Trigger in cue lists == | ||
In previous lesson we learnt how to create cues and scene lists. Now we | In previous lesson we learnt how to create cues and scene lists. Now we are familar with most of the attributes of scene list, but some more explanation about the trigger is nessecary. The default trigger is "follow", i.e. the next cue will be started after the previous one is faded-in. | ||
'''Important:''' When you change the trigger type, you need to apply the changes with Enter. | '''Important:''' When you change the trigger type, you need to apply the changes with Enter. | ||
| Line 29: | Line 35: | ||
optional: fade in cue after 3 GO presses, default is 1 | optional: fade in cue after 3 GO presses, default is 1 | ||
|- | |- | ||
| follow || 5s || wait until the cue is faded in, then the countdown is started | | follow || 5s || wait until the previous cue is faded in, then the countdown is started | ||
|- | |- | ||
| wait || 5s || countdown starts when | | wait || 5s || wait time countdown starts when wait or follow of previous cue is completed | ||
|- | |- | ||
| timecode || 00:26:05 || expects external timecode information | | timecode || 00:26:05 || expects external timecode information | ||
| Line 37: | Line 43: | ||
| rtc || 13:00:00 || real time clock, fade in a cue at a specified time | | rtc || 13:00:00 || real time clock, fade in a cue at a specified time | ||
|- | |- | ||
| beat || (opt) 3 || connect in Input Layer panel the "manual beat" output per Drag & Drop with "Beat" input of scene list | | beat || (opt) 3 || connect in Input Layer panel the "manual beat" output per Drag & Drop with "Beat" input of scene list | ||
optional: fade in cue after 3 beats, default is 1 | optional: fade in cue after 3 beats, default is 1 | ||
| Line 43: | Line 48: | ||
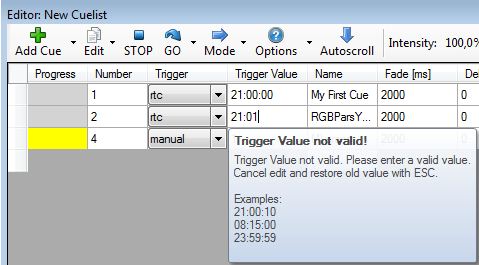
In case you type a wrong format into the '''trigger value''' field you | In case you type a wrong format into the '''trigger value''' field you will get some hints about the expected input syntax. See the example for the "follow" type. | ||
{{BoxHint | |||
|Text= Type in combined time information without "blank" character, e.g. 1m20s | |||
}} | |||
[[File:DMXC3L11 triggerhelpcontextfollow.JPG]] | [[File:DMXC3L11 triggerhelpcontextfollow.JPG]] | ||
| Line 55: | Line 62: | ||
Currently the time code from Digital Enlightenment Mediacenter [http://www.digital-enlightenment.de/mediacenter.htm] is supported only. Support of other time codes will follow. | Currently the time code from Digital Enlightenment Mediacenter [http://www.digital-enlightenment.de/mediacenter.htm] is supported only. Support of other time codes will follow. | ||
''' | ===Use of beat trigger=== | ||
If you want to keep off your scenes beat controled, you need to select the trigger '''beat''' . | |||
{{BoxHinweis|Text | |||
In the Trigger field value is specified after how many Beat signals the next cue is called | |||
}} | |||
{{Bild_mit_Unterschrift |Beattrigger.PNG|4|Beispiel für Beattrigger|center}} | |||
Now you should inform the '''Cue List''' what is the source of Beat Signal (Manual Beat/Audioanalyzer....) | |||
Therefore you have to make an assignment [[Lektion_22_Tut3|'''Input Assignment''']] , where you must drag an item per Drag&Drop to the beat entry of the cue list. | |||
{{Bild_mit_Unterschrift |DMXC3_L11_InputassignmentBeat.png|5|Input Assignment|center}} | |||
== | ==Summary== | ||
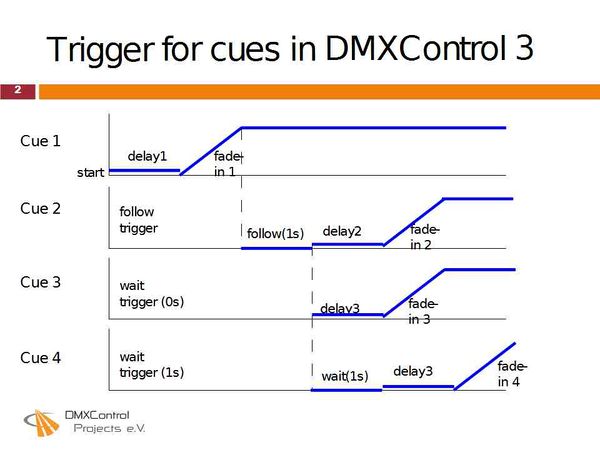
Following figure shows the dependency and capability of mixing several trigger types: | Following figure shows the dependency and capability of mixing several trigger types: | ||
[[File:DMXC3L11 SlideDMXC3Trigger.jpg|600px]] | [[File:DMXC3L11 SlideDMXC3Trigger.jpg|600px]] | ||
* Each cue has its delay-time (before the fade in start) - delay1 to delay4 | |||
* Cue2 has a follow-trigger of 1s, it starts 1s after the fade in the previous cue is completed | |||
* Cue3 has a wait-trigger, but 0s. Thus cue3 starts immediately after the follow the previous scene has expired | |||
* Cue4 also has a wait-trigger (1s). So it will wait for 1s after the wait (0s) of the previous scene has expired. | |||
==Excercise== | |||
* Test a mix of "follow" and "wait" triggers in one scene list | |||
* Use a tool providing timecodes (DE MediaCenter) and test a scenelist that is completely based on timecodes | |||
==Certificate== | ==Certificate== | ||
| Line 80: | Line 103: | ||
__NOTOC__ | __NOTOC__ | ||
__NOTITLE__ | __NOTITLE__ | ||
{{NavigationTop-Tut3 | |||
| zurückLink = Lektion_10_Tut3 | |||
| zurückText = Lektion 10 | |||
| hoch = [[Tutorials DMXControl 3|Inhaltsverzeichnis]] | |||
| vorLink = Lektion_12_Tut3 | |||
| vorText = Lektion 12 | |||
}} | |||
[[Kategorie:DMXControl 3]] | |||
Revision as of 23:21, 4 January 2013
{{#tree:id=dmxc3|openlevels=1|root=DMXC 3 lessons|
- preamble
- lesson 1: Installation and configuration
- lesson 2: The GUI panel concept
- lesson 3: Creating and patching fixtures
- lesson 4: The live view panel
- lesson 5: Setting properties with property panels
- lesson 6: Output plugins
- lesson 7: Summery and details - Setting
- lesson 8: Scenes (cues) and scene lists
- lesson 9: Fanning, chasers and other effects
- lesson 10: The programmer view
- lesson 11: Trigger concepts
- lesson 12: Editing scenes and scenelists
- lesson 13: Presets
- lesson 14: Summary and details - Programming
- lesson 15: Working with parallel scene lists
- lesson 16: Softpult
- lesson 17: Artnet
- lesson 18: Multi-media: Beamer tool, Matrix etc.
- lesson 19: Other clients and plugins (Android, iOS, ...
- lesson 20: Create new device definitions
- lesson 21: free topic
- lesson 22: Hints for testers and test reporting
- appendix1: Summary of commands ans shortcuts
- appendix2: Kernel menu tree
}}
Overview
Cue lists are the best means to control your show. In this lesson we explain how to define the sequence and the flow of scenes by triggers.
Lecture 11: Trigger in cue lists
In previous lesson we learnt how to create cues and scene lists. Now we are familar with most of the attributes of scene list, but some more explanation about the trigger is nessecary. The default trigger is "follow", i.e. the next cue will be started after the previous one is faded-in.
Important: When you change the trigger type, you need to apply the changes with Enter.
But there are some other types of triggers, the following table informs you about its behaviour.
| Type | Example format | Description |
|---|---|---|
| manual | (opt) 3 | use GO to fade in next cue
optional: fade in cue after 3 GO presses, default is 1 |
| follow | 5s | wait until the previous cue is faded in, then the countdown is started |
| wait | 5s | wait time countdown starts when wait or follow of previous cue is completed |
| timecode | 00:26:05 | expects external timecode information |
| rtc | 13:00:00 | real time clock, fade in a cue at a specified time |
| beat | (opt) 3 | connect in Input Layer panel the "manual beat" output per Drag & Drop with "Beat" input of scene list
optional: fade in cue after 3 beats, default is 1 |
In case you type a wrong format into the trigger value field you will get some hints about the expected input syntax. See the example for the "follow" type.
| |
Type in combined time information without "blank" character, e.g. 1m20s |
Here is the example for the timecode selection.
Currently the time code from Digital Enlightenment Mediacenter [1] is supported only. Support of other time codes will follow.
Use of beat trigger
If you want to keep off your scenes beat controled, you need to select the trigger beat . Template unused
Template:Bild mit Unterschrift
Now you should inform the Cue List what is the source of Beat Signal (Manual Beat/Audioanalyzer....) Therefore you have to make an assignment Input Assignment , where you must drag an item per Drag&Drop to the beat entry of the cue list.
Summary
Following figure shows the dependency and capability of mixing several trigger types:
- Each cue has its delay-time (before the fade in start) - delay1 to delay4
- Cue2 has a follow-trigger of 1s, it starts 1s after the fade in the previous cue is completed
- Cue3 has a wait-trigger, but 0s. Thus cue3 starts immediately after the follow the previous scene has expired
- Cue4 also has a wait-trigger (1s). So it will wait for 1s after the wait (0s) of the previous scene has expired.
Excercise
- Test a mix of "follow" and "wait" triggers in one scene list
- Use a tool providing timecodes (DE MediaCenter) and test a scenelist that is completely based on timecodes
Certificate
I have understood the topics of this lecture and want to continue with next course: Lesson 12


