m (Jkuehn moved page Lesson 16 to Lesson 16 Tut3 without leaving a redirect) |
No edit summary |
||
| Line 6: | Line 6: | ||
{{DMXC3_lesson/en}} | {{DMXC3_lesson/en}} | ||
{{NavigationTop-Tut3 | {{NavigationTop-Tut3 | ||
| | | LinkBackwards = Lesson_15_Tut3 | ||
| | | TextBackwards = Lesson 15 | ||
| | | LinkForwards = Lesson_17_Tut3 | ||
| TextForwards = Lesson 17 | |||
| | |||
}} | }} | ||
| Line 28: | Line 27: | ||
In principle, you can reconstruct any consoles with the Softdesk editor. | In principle, you can reconstruct any consoles with the Softdesk editor. | ||
The Softpult (Softdesk) tool can be enabled via the '''plugin manager''', see | The Softpult (Softdesk) tool can be enabled via the '''plugin manager''', see Lesson6/en. Afterwards you can find a new menu entry "Softdesk" within the plugins menu. When you open this plugin an administration GUI appears at first: | ||
[[File:DMXC3L16 SoftDesk plugin.JPG]] | [[File:DMXC3L16 SoftDesk plugin.JPG]] | ||
| Line 84: | Line 83: | ||
{{BoxHinweis|Text=Do not forget switching off the design mode at run time.}} | {{BoxHinweis|Text=Do not forget switching off the design mode at run time.}} | ||
The softpult windows are integrated into the panel system, see | The softpult windows are integrated into the panel system, see Lesson2/en. That means you can have attached panels or flying windows containing the softpult. | ||
The individual soft desks are then opened with a double (with Design Mode off). | The individual soft desks are then opened with a double (with Design Mode off). | ||
| Line 98: | Line 97: | ||
==Certificate== | ==Certificate== | ||
I have understood the topics of this lecture and want to continue with next course: | I have understood the topics of this lecture and want to continue with next course: | ||
Lesson 17 | |||
[[de:Lektion 16]] | [[de:Lektion 16]] | ||
[[en:Lesson 16]] | [[en:Lesson 16]] | ||
__NOTOC__ | __NOTOC__ | ||
__NOTITLE__ | __NOTITLE__ | ||
{{NavigationTop-Tut3 | {{NavigationTop-Tut3 | ||
| | | LinkBackwards = Lesson_15_Tut3 | ||
| | | TextBackwards = Lesson 15 | ||
| | | LinkForwards = Lesson_17_Tut3 | ||
| TextForwards = Lesson 17 | |||
| | |||
}} | }} | ||
[[category:DMXControl 3]] | |||
[[ | |||
Revision as of 00:20, 13 January 2013
{{#tree:id=dmxc3|openlevels=1|root=DMXC 3 lessons|
- preamble
- lesson 1: Installation and configuration
- lesson 2: The GUI panel concept
- lesson 3: Creating and patching fixtures
- lesson 4: The live view panel
- lesson 5: Setting properties with property panels
- lesson 6: Output plugins
- lesson 7: Summery and details - Setting
- lesson 8: Scenes (cues) and scene lists
- lesson 9: Fanning, chasers and other effects
- lesson 10: The programmer view
- lesson 11: Trigger concepts
- lesson 12: Editing scenes and scenelists
- lesson 13: Presets
- lesson 14: Summary and details - Programming
- lesson 15: Working with parallel scene lists
- lesson 16: Softpult
- lesson 17: Artnet
- lesson 18: Multi-media: Beamer tool, Matrix etc.
- lesson 19: Other clients and plugins (Android, iOS, ...
- lesson 20: Create new device definitions
- lesson 21: free topic
- lesson 22: Hints for testers and test reporting
- appendix1: Summary of commands ans shortcuts
- appendix2: Kernel menu tree
}} Template:NavigationTop-Tut3
Overview
In this lesson you will learn something about the Softpult plugin. This tool allows you to create panels simulating a pult according to your own design ideas.
Lecture 16: Softpult
DMXControl 3 offers the Softdesk, which replaces the popular command box from DMXControl 2. The advantages of soft desks are as follows:
- flexible layout options
- Wider variety of controls
- Potentially there will be Softdesk variants on external clients (tablets, etc.).
In principle, you can reconstruct any consoles with the Softdesk editor.
The Softpult (Softdesk) tool can be enabled via the plugin manager, see Lesson6/en. Afterwards you can find a new menu entry "Softdesk" within the plugins menu. When you open this plugin an administration GUI appears at first:
Here you can create, delete, edit, copy, import and export your instancies of softdesks. There simply set the hook. Then you find a new entry "Softdesk" under the menu item "Windows" (possibly restarting the GUI-clients required).
Template:Bild mit Unterschrift
After opening the plugin via the menu a GUI appears for the first administration of the various consoles. This panel is initially empty, but on the right side are 6 buttons.
Here you can create and edit individual desk surfaces, copy, import or export. By double-clicking in the blue line, you can change the name of the console to be created (if design mode is set). The new consoles will appear in the Project Explorer too.
Template unused
You can create multiple console surfaces, which can then be activated simultaneously at run time (but you don't have several banks within a softpult available).
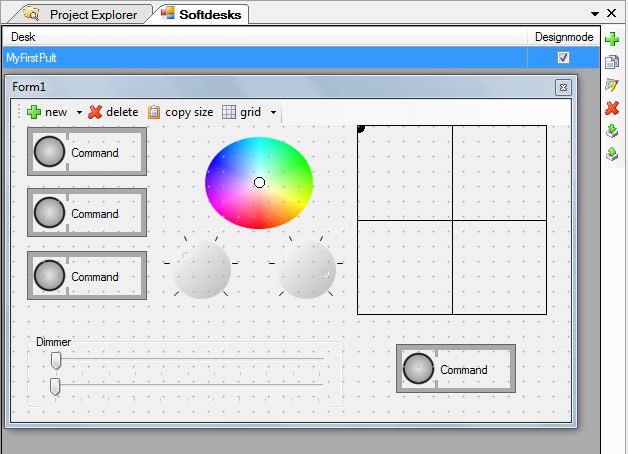
When you select the design mode (edit mode) you can add your favorite elements from the set of sliders, buttons, rotary faders or XYpads. There are also graphical design elements such as labels, separators and group boxes available. Try it, also the design grid mode!
Here you can see one possible result:

Template:Bild mit Unterschrift
You can customize the elements in design mode by using the property context menu. Simply double click the control or call it by right click in the designMode. The following figure shows the property box for a button (right mouse click in design mode). For example you can modify the button name, colors and the toggle mode property - here the name was changed to "Flash button".

Template:Bild mit Unterschrift
Template unused
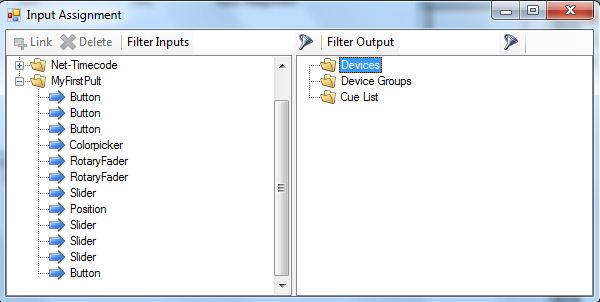
In the next step you have to connect your softdesk with your project, i.e. you have to assign functions to your softpult resp. control elements.
This has to be performed with the input assignment panel (menu Application Settings (-->Lesson22)). On left hand side you find the controls, on right hand side the DMXControl explorer is shown. Simply drag and drop the control elements to certain properties, attributes or elements to make a connection.

Template:Bild mit Unterschrift
Template unused
The softpult windows are integrated into the panel system, see Lesson2/en. That means you can have attached panels or flying windows containing the softpult. The individual soft desks are then opened with a double (with Design Mode off).
Have fun trying! We wish you a high level of artistic creativity for your own desks!
Excercise
- Create two softpults, one consisting of buttons only, the other one should contain all types of control elements
- Control colors with your button softpult
- connect the XYpad with your moving light and test the function
Certificate
I have understood the topics of this lecture and want to continue with next course: Lesson 17
