| [[File:{{{Logo}}}|48px|link=]] | {{{Pagetitle}}} |
Overview
Cue lists are the best tool to control the flow of your show. In this lesson we explain how to define the sequence and the change of scenes by triggers.
Lecture 11: Trigger in cue lists
In previous lessons we learnt how to create cues and scene lists. Now we are familar with most of the attributes of the scene list but some more explanation about the trigger is nessecary. The default trigger is "follow". That means the next cue will be started after the previous one is faded in.
Important: When you change the trigger type, you need to apply the changes with the enter-key or by clicking in another field.
Besides of follow there are some other types of triggers. The following table informs you about their behaviours.
| Type | Example format | Description |
|---|---|---|
| manual | (optional) 3 | use GO to fade in next cue
optional: fade in cue after 3 GO presses, default is 1 |
| follow | 5s | wait until the previous cue is faded in, then the countdown is started |
| wait | 5s | wait time countdown starts when wait or follow of previous cue is completed |
| timecode | 00:26:05 | expects external timecode information |
| rtc | 13:00:00 | real time clock, fade in a cue at a specified time |
| beat | (optional) 3 | you have to do some more settings, see next paragraph below!
optional: fade in cue after 3 beats, default is 1 |
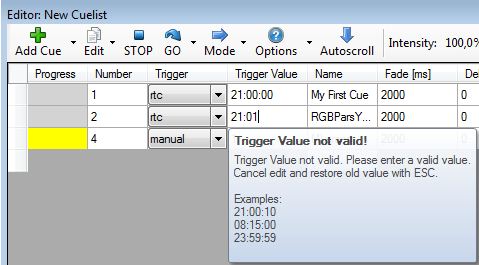
In case you type a wrong format into the trigger value field you will get some hints about the expected input syntax. See the example for the "follow" type.
| |
Type in combined time information without "blank" characters, e.g. 1m20s |
Here is the example for the realtimecode selection.
Currently only the time code from Digital Enlightenment Mediacenter [1] is supported. Support of other time codes will follow.
Use of beat trigger
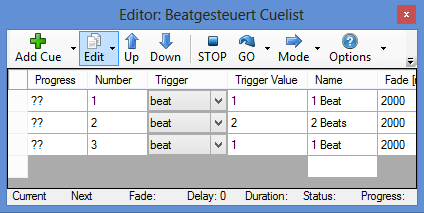
If you want to have your scenes beat controled, you need to select the trigger beat .
| |
In the Trigger field you can specify after how many beat signals the next cue is called |

|
| Figure 4: Example for beattrigger |
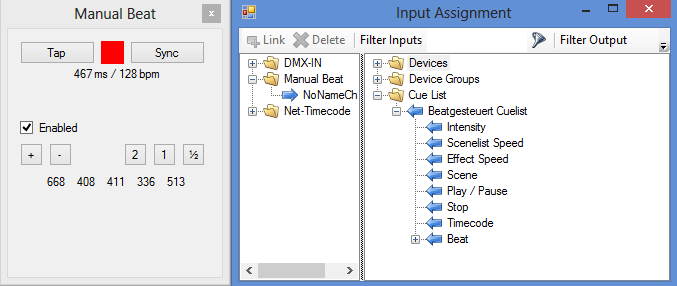
Now you have to inform the Cue List which source of the beat signal should be used (manual beat/audioanalyzer....) Therefore you have to assign an input in the Input Assignment via drag&drop to the beat entry of the cue list (see linked Lesson 22 "Input Assignment" for further details!).

|
| Figure 5: Input Assignment |
Summary
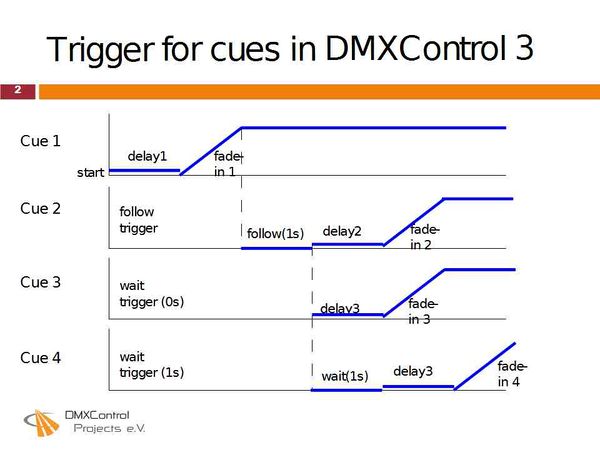
The following figure shows the dependencys and capabilitys of mixing several trigger types:
- Each cue has its delay-time (before the fade-in start) - delay1 to delay3
- Cue2 has a follow-trigger of 1s. It starts 1s after the fade-in of the previous cue is completed
- Cue3 has a wait-trigger, but 0s. Thus cue3 starts immediately after the follow of the previous scene has expired
- Cue4 also has a wait-trigger (1s). So it will wait for 1s after the wait (0s) of the previous scene has expired.
Excercise
- Test a mix of "follow" and "wait" triggers in one scene list
- Use a tool providing timecodes (DE MediaCenter) and test a scenelist that is completely based on timecodes
Certificate
I have understood the topics of this lecture and want to continue with next course: Lesson 12


