No edit summary |
No edit summary |
||
| (26 intermediate revisions by 12 users not shown) | |||
| Line 1: | Line 1: | ||
{{Manual Header | |||
| Type = DMXC3 Tutorials | |||
| Version = 3.0.0 | |||
| LinkBackwards = Lesson_9_Tut3 | |||
| TextBackwards = Lesson 9 | |||
| LinkForwards = Lesson_11_Tut3 | |||
| TextForwards = Lesson 11 | |||
}} | |||
==Overview== | ==Overview== | ||
Here we explain the "'''Programmer'''" view - a tool that helps in programming and "debugging" your show. | |||
==Lecture 10: The programmer view == | ==Lecture 10: The programmer view == | ||
The '''Programmer''' tool logs all modifications you made and shows the current content of the "cue buffer". | |||
{{Manual Box | en | Hint | Remember the "save scene" dialog in DMXControl 2? There you were asked to define the channels and values before finally saving the cue. The '''Programmer''' is an extended view of this functionality. | |||
}} | |||
The | |||
Let's illustrate this by an example. Perform the following steps: | |||
* First, open the moving lights shutters and select the color green | |||
* Second, set the gobos of all devices on "Gobo2" | |||
* Third, set the group of front lights to 50% brightness | |||
{{Picture_with_subtitle |DMXC3L10 liveviewProgrammer.JPG|1|Stage View|center}} | |||
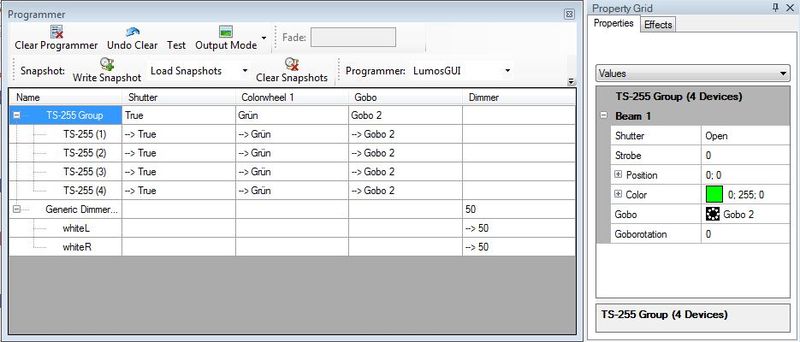
The results are now shown in the programmer. Please be aware that the cue is not saved at this point in time, because further modification might follow. | |||
{{Picture_with_subtitle |DMXC3L10 Programmer.JPG|2|All changes of the device settings are shown in the programmer|center|800px}} | |||
If you change your mind on the current cue, you can press the '''Clear Programmer''' button to remove all settings and refresh the programmer. | |||
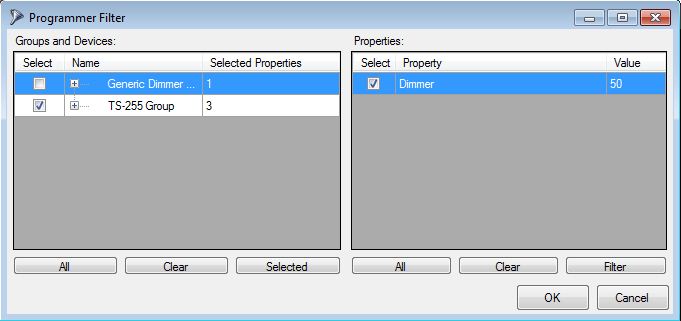
Now you can see in the '''Programmer''' which values would be stored in the cue. When you save the cue, you are able to select the desired items in the '''Programmer Filter''' that appeared before. In the following example, we do not save the "Generic Dimmer" (by deselecting them) because we probably want to save them in another cue list. | |||
{{Picture_with_subtitle |DMXC3L10 ProgrammerFilter.JPG|3|View of the Programmer Filter|center}} | |||
If your cue is OK, then assign it to a cue list or an executor by pressing the "'''Add new Cue'''" button and then clear the programmer (to provide "space" for the next cue). | |||
In order to program quicker, there is the snapshot function. With the button '''Write Snapshot''' you can save the current selections in the programmer and reload them later by using the drop-down menu ('''Load Snapshots'''). This helps you to program many similar cues with little effort. | |||
In addition to the above, you can also create a filter with '''Set Filter''' or delete filters with '''Clear Filter'''. Filters are mainly used in '''Output Mode'''. With filters you can adjust the values in the programmer that are actually sent out. If '''All''' is active, all the values in the programmer are sent. With '''Filtered''' only the values that have been activated in the filter are sent. And with '''Blind''' no values are sent out. | |||
==Exercise== | |||
1) Repeat the above scenario | |||
[[de:Lektion_10_Tut3]] | |||
[[Category: Tutorials DMXControl 3]] | |||
Latest revision as of 19:56, 2 March 2025
</onlyinclude>
|}
Overview
Here we explain the "Programmer" view - a tool that helps in programming and "debugging" your show.
Lecture 10: The programmer view
The Programmer tool logs all modifications you made and shows the current content of the "cue buffer".
| Remember the "save scene" dialog in DMXControl 2? There you were asked to define the channels and values before finally saving the cue. The Programmer is an extended view of this functionality. |
Let's illustrate this by an example. Perform the following steps:
- First, open the moving lights shutters and select the color green
- Second, set the gobos of all devices on "Gobo2"
- Third, set the group of front lights to 50% brightness

|
| Figure 1: Stage View |
The results are now shown in the programmer. Please be aware that the cue is not saved at this point in time, because further modification might follow.

|
| Figure 2: All changes of the device settings are shown in the programmer |
If you change your mind on the current cue, you can press the Clear Programmer button to remove all settings and refresh the programmer.
Now you can see in the Programmer which values would be stored in the cue. When you save the cue, you are able to select the desired items in the Programmer Filter that appeared before. In the following example, we do not save the "Generic Dimmer" (by deselecting them) because we probably want to save them in another cue list.

|
| Figure 3: View of the Programmer Filter |
If your cue is OK, then assign it to a cue list or an executor by pressing the "Add new Cue" button and then clear the programmer (to provide "space" for the next cue).
In order to program quicker, there is the snapshot function. With the button Write Snapshot you can save the current selections in the programmer and reload them later by using the drop-down menu (Load Snapshots). This helps you to program many similar cues with little effort.
In addition to the above, you can also create a filter with Set Filter or delete filters with Clear Filter. Filters are mainly used in Output Mode. With filters you can adjust the values in the programmer that are actually sent out. If All is active, all the values in the programmer are sent. With Filtered only the values that have been activated in the filter are sent. And with Blind no values are sent out.
Exercise
1) Repeat the above scenario
