No edit summary |
No edit summary |
||
| (17 intermediate revisions by 7 users not shown) | |||
| Line 1: | Line 1: | ||
{{Manual Header | |||
| Type = DMXC3 Tutorials | |||
| Version = 3.0.0 | |||
| LinkBackwards = Lesson_18_Tut3 | |||
| TextBackwards = Lesson 18 | |||
| LinkForwards = Lesson_20_Tut3 | |||
| TextForwards = Lesson 20 | |||
}} | |||
==Overview== | ==Overview== | ||
In this lesson some additional clients are in focus. The client/server concept of DMXControl allows the connection to other clients (Smartphones, Tabs, etc.) in simple way. | In this lesson some additional clients are in focus. The client/server concept of DMXControl allows the connection to other clients (Smartphones, Tabs, etc.) in simple way. | ||
==Lecture 19: Further DMXControl clients == | ==Lecture 19: Further DMXControl clients == | ||
{{Manual Box | en | Hint | Currently the OSC plugin is not offered. We expect it in next release. | |||
}} | |||
in development: | in development: | ||
* [http://www.dmxcontrol.de/wiki/Projekte/DMXControl-for-Android-Projekt DMXControl-for-Android-Projekt] | * [http://www.dmxcontrol.de/wiki/Projekte/DMXControl-for-Android-Projekt DMXControl-for-Android-Projekt] | ||
The smartphone apps (clients) communicate via OSC with DMXControl 3. | |||
Therefore you have to enable the OSC plugin via "plugin manager", see following figure: | Therefore you have to enable the OSC plugin via "plugin manager", see following figure: | ||
{{Picture_with_subtitle|DMXC3L19_OSC1.JPG|1|Activating OSC-Plugin|center}} | |||
Now, you should define the IP connection in the panel "connection form". Press the "+" button to create a new connection. | |||
In the first approach we use unicast with UDP. Please let the IP address on 0.0.0.0, but set the correct port where your client sends the OSC messages. Now you can start (activate) this connection by a click to start button: | |||
Now, you should define the IP connection in the panel "connection form". In | {{Picture_with_subtitle|DMXC3L19_OSC2.JPG|2|OSC-Plugin setup|center}} | ||
unicast with UDP. Please let | |||
==Additional links and references== | ==Additional links and references== | ||
* | * [http://www.hexler.net TouchOSC] | ||
[http://www. | |||
[[de:Lektion_19_Tut3]] | |||
[[Category: Tutorials DMXControl 3]] | |||
Latest revision as of 19:58, 2 March 2025
</onlyinclude>
|}
Overview
In this lesson some additional clients are in focus. The client/server concept of DMXControl allows the connection to other clients (Smartphones, Tabs, etc.) in simple way.
Lecture 19: Further DMXControl clients
| Currently the OSC plugin is not offered. We expect it in next release. |
in development:
The smartphone apps (clients) communicate via OSC with DMXControl 3.
Therefore you have to enable the OSC plugin via "plugin manager", see following figure:

|
| Figure 1: Activating OSC-Plugin |
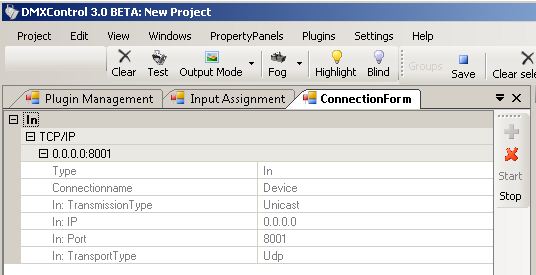
Now, you should define the IP connection in the panel "connection form". Press the "+" button to create a new connection. In the first approach we use unicast with UDP. Please let the IP address on 0.0.0.0, but set the correct port where your client sends the OSC messages. Now you can start (activate) this connection by a click to start button:

|
| Figure 2: OSC-Plugin setup |
