No edit summary |
No edit summary |
||
| (15 intermediate revisions by 7 users not shown) | |||
| Line 1: | Line 1: | ||
{{ | {{Manual Header | ||
| | | Type = DMXC3 Tutorials | ||
| | | Version = 3.0.0 | ||
| LinkBackwards = Lesson_4_Tut3 | |||
| TextBackwards = Lesson 4 | |||
| LinkForwards = Lesson_6_Tut3 | |||
| TextForwards = Lesson 6 | |||
}} | }} | ||
==Overview== | ==Overview== | ||
In this lesson we explain how to control the properties of devices by several property panels. DMXControl 3 provides an very powerful abstraction level for properties, allowing to handle different devices in the same way. | In this lesson we explain how to control the properties of devices by several property panels. DMXControl 3 provides an very powerful abstraction level for properties, allowing to handle different devices in the same way. | ||
==Lecture 5: Setting properties of fixtures == | ==Lecture 5: Setting properties of fixtures == | ||
The first step is to select devices or groups in the '''stage view''', see previous lesson [[Lesson 4]]. | |||
You can set properties of the selected devices by means of the "property panel". | |||
Simply click on a color or select a gobo within the beam panel. Of course, you shouldn't forget to open the shutter or to set the brightness in the intensity panel. | |||
In the animation of the icons in the '''Stage View''' you can see the results of your changes, especially for the moving lights. | |||
{{Picture_with_subtitle|DMXC3L05 propertyPanels.JPG|1|View of the property panels|center|600px}} | |||
Movements | Movements can be controlled by the X/Y (pan/tilt)panel. The movement is also shown in the live view icons. Note that only the destination position will be stored later and not the path towards it. | ||
Most of the property panels are self | Most of the property panels are self explanatory. We have | ||
* color panel - | * color panel - pick the wanted color | ||
* position panel - set the pan/tilt position | * position panel - set the pan/tilt position | ||
* intensity panel - set brightness | * intensity panel - set brightness | ||
| Line 49: | Line 47: | ||
|- | |- | ||
| Lumos | | Lumos | ||
| Lumos stands for "light", it is a direct function for dimmer/shutter | | Lumos stands for "light", it is a direct function for dimmer/shutter. Lumos opens it (100%), NoX closes it (0%). | ||
| | | You don't need to know if the device includes a shutter and/or dimmer. | ||
|- | |- | ||
|} | |} | ||
{{Picture_with_subtitle|DMXC3L05 propertyTS.JPG|2|View of the property grid|center}} | |||
A more sophisticated way of property settings is provided by the "property panel". In this panel the properties are shown with current values. Sometimes you can modify the values by typing in a percentage/beam angle/DMX value, more often you can find a dropdown menu that allows to select properties in more abstract or graphical view, see the color dropdown as example for setting the RGB value of RGB Pars. | |||
{{Picture_with_subtitle|DMXC3L05 propertyRGBParColor.jpg|3|Property grid with color selection|center}} | |||
The following picture demonstrates a very interesting capability of the new DMXControl kernel: You can even select different device types in parallel and set a common property in one step. | |||
This also works with devices that have different functions (such as scanners and LED lights). | |||
The DMXControl kernel engine will assign the best matching values automatically. Of course, if required, you can modify the attributes manually. | |||
{{Picture_with_subtitle|DMXC3L05 propertyMix.JPG|4|Changing the color of different fixtures|center}} | |||
In this example, a moving light and PAR lights were selected. Both devices can be assigned the color yellow in one step in the Property Grid. | |||
In addition to the simultaneous control of multiple devices, you can also control multiple groups as if they were one unit. Therefore you have to change the option in the Property Grid from '''value''' to '''Group handling''' . | |||
{{Picture_with_subtitle|DMXC3L05 PropertyGroupHandling.jpg|5|Property grid options|center}} | |||
==Excercise== | ==Excercise== | ||
1) Set the moving lights to red color, the RBG Pars to blue and open the two front light lamps (dimmer) to 100% | |||
<br> | |||
2) Now set all left hand lamps to yellow and all right hand lamps to pink. You should need just 4 operations (mouse clicks) for this task. | |||
<br> | |||
3) Observe the movement of TS-255 devices when using the X/Y pad (position panel). | |||
[[de:Lektion_5_Tut3]] | |||
[[Category: Tutorials DMXControl 3]] | |||
Latest revision as of 11:58, 2 March 2025
</onlyinclude>
|}
Overview
In this lesson we explain how to control the properties of devices by several property panels. DMXControl 3 provides an very powerful abstraction level for properties, allowing to handle different devices in the same way.
Lecture 5: Setting properties of fixtures
The first step is to select devices or groups in the stage view, see previous lesson Lesson 4. You can set properties of the selected devices by means of the "property panel". Simply click on a color or select a gobo within the beam panel. Of course, you shouldn't forget to open the shutter or to set the brightness in the intensity panel.
In the animation of the icons in the Stage View you can see the results of your changes, especially for the moving lights.

|
| Figure 1: View of the property panels |
Movements can be controlled by the X/Y (pan/tilt)panel. The movement is also shown in the live view icons. Note that only the destination position will be stored later and not the path towards it.
Most of the property panels are self explanatory. We have
- color panel - pick the wanted color
- position panel - set the pan/tilt position
- intensity panel - set brightness
- gobo panel - select gobo
- beam panel - fade between two beams (e.g. in beamer tool)
Some remarks to the intensity panel:
| Attribute | Description | Example |
|---|---|---|
| dimmer | set dimmer value by fader or by static values | in percent |
| strobe | strobe speed | |
| shutter | open or close shutter | |
| Lumos | Lumos stands for "light", it is a direct function for dimmer/shutter. Lumos opens it (100%), NoX closes it (0%). | You don't need to know if the device includes a shutter and/or dimmer. |

|
| Figure 2: View of the property grid |
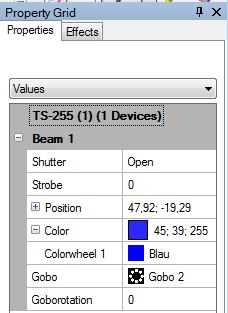
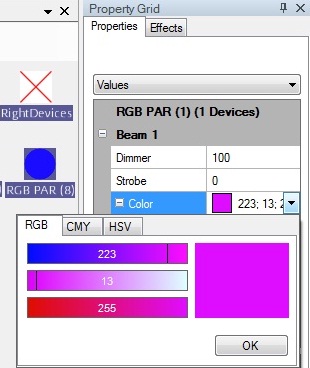
A more sophisticated way of property settings is provided by the "property panel". In this panel the properties are shown with current values. Sometimes you can modify the values by typing in a percentage/beam angle/DMX value, more often you can find a dropdown menu that allows to select properties in more abstract or graphical view, see the color dropdown as example for setting the RGB value of RGB Pars.

|
| Figure 3: Property grid with color selection |
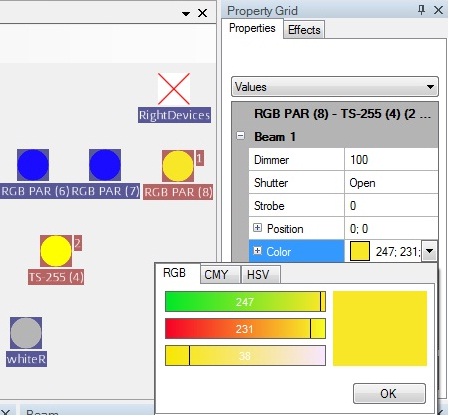
The following picture demonstrates a very interesting capability of the new DMXControl kernel: You can even select different device types in parallel and set a common property in one step. This also works with devices that have different functions (such as scanners and LED lights). The DMXControl kernel engine will assign the best matching values automatically. Of course, if required, you can modify the attributes manually.

|
| Figure 4: Changing the color of different fixtures |
In this example, a moving light and PAR lights were selected. Both devices can be assigned the color yellow in one step in the Property Grid.
In addition to the simultaneous control of multiple devices, you can also control multiple groups as if they were one unit. Therefore you have to change the option in the Property Grid from value to Group handling .

|
| Figure 5: Property grid options |
Excercise
1) Set the moving lights to red color, the RBG Pars to blue and open the two front light lamps (dimmer) to 100%
2) Now set all left hand lamps to yellow and all right hand lamps to pink. You should need just 4 operations (mouse clicks) for this task.
3) Observe the movement of TS-255 devices when using the X/Y pad (position panel).
