No edit summary |
No edit summary |
||
| (12 intermediate revisions by 7 users not shown) | |||
| Line 1: | Line 1: | ||
{{ | {{Manual Header | ||
| | | Type = DMXC3 Tutorials | ||
| | | Version = 3.0.0 | ||
| LinkBackwards = Lesson_16_Tut3 | |||
| TextBackwards = Lesson 16 | |||
| LinkForwards = Lesson_18_Tut3 | |||
| TextForwards = Lesson 18 | |||
}} | }} | ||
==Overview== | |||
Here the audio analyzer is presented as a plugin in DMXControl 3. | |||
==Lecture 17: Audio Analyzer == | |||
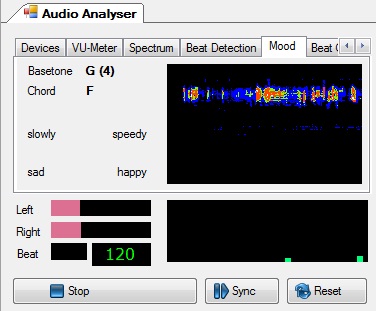
The audio analyzer is implemented in DMXControl 3 as plugin and and you will have to enable it via '''Plugin Manager'''. It then appears as a menu item under '''Windows -> Audio Analyzer'''. The audio analyzer provides essentially the same features as the Soundanalyser of DMXControl 2. | |||
{{Manual Box | en | Hint | This plugin is still in an experimental stage. | |||
}} | |||
{{Picture_with_subtitle |DMXC3L17 PluginAudioAnalyser.jpg|1|Audio Analyzer Window|center|450px}} | |||
The main purpose of audio player is the automatic generation of beats from a song in order to trigger the beats in a beat-driven cue list.(see [[Lesson_11_Tut3|Lesson 11: Trigger]]). | |||
The plugin contains several tabs: | |||
* '''Devices''' is responsible for the configuration. Here you choose the particular audio input | |||
* With'''VU meter''', '''Spectrum''' and '''Beat Detection''' you can select the different analysis method | |||
* '''Mood''' should analyze automatically and in real time the mood of an audio signal and the "Automatic Sound Controlled Light Show" lead (Vision!) | |||
* Using '''Beat generator'''You can manually create the Beats (Tap-key) or you can specify a certain Beats-Per-Minute (BPM) value | |||
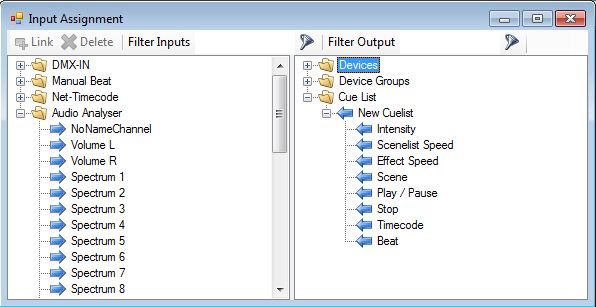
And now the question remains, how will the results of the analysis be assigned to drive the cuelist? You already have an idea? ... Of course, this is the same as the'' 'input Assignment''' concept introduced in [[Lesson_22_Tut3|Lesson 22]]. | |||
{{Picture_with_subtitle |DMXC3L17 PluginAudioAnalyserInputAssignment.JPG|2|Assigning sound events using the input Assignment Window|center|600px}} | |||
==Exercise== | |||
1) Activate the AudioAnalyzer. If your sound card does not feature internal redirection, and you currently have no external player available, use the microphone input as a substitute. | |||
== | |||
==Additional links and references== | ==Additional links and references== | ||
* | *[http://www.dmxcontrol.de/wiki/Sound_Analyzer_DMXC2 Soundanalyzer DMXControl 2] (only german) | ||
[[de:Lektion_17_Tut3]] | |||
[[Category: Tutorials DMXControl 3]] | |||
Latest revision as of 19:58, 2 March 2025
</onlyinclude>
|}
Overview
Here the audio analyzer is presented as a plugin in DMXControl 3.
Lecture 17: Audio Analyzer
The audio analyzer is implemented in DMXControl 3 as plugin and and you will have to enable it via Plugin Manager. It then appears as a menu item under Windows -> Audio Analyzer. The audio analyzer provides essentially the same features as the Soundanalyser of DMXControl 2.
| This plugin is still in an experimental stage. |

|
| Figure 1: Audio Analyzer Window |
The main purpose of audio player is the automatic generation of beats from a song in order to trigger the beats in a beat-driven cue list.(see Lesson 11: Trigger).
The plugin contains several tabs:
- Devices is responsible for the configuration. Here you choose the particular audio input
- WithVU meter, Spectrum and Beat Detection you can select the different analysis method
- Mood should analyze automatically and in real time the mood of an audio signal and the "Automatic Sound Controlled Light Show" lead (Vision!)
- Using Beat generatorYou can manually create the Beats (Tap-key) or you can specify a certain Beats-Per-Minute (BPM) value
And now the question remains, how will the results of the analysis be assigned to drive the cuelist? You already have an idea? ... Of course, this is the same as the 'input Assignment' concept introduced in Lesson 22.

|
| Figure 2: Assigning sound events using the input Assignment Window |
Exercise
1) Activate the AudioAnalyzer. If your sound card does not feature internal redirection, and you currently have no external player available, use the microphone input as a substitute.
Additional links and references
- Soundanalyzer DMXControl 2 (only german)
