m (→Certificate) |
No edit summary |
||
| (19 intermediate revisions by 7 users not shown) | |||
| Line 1: | Line 1: | ||
{{ | {{Manual Header | ||
| | | Type = DMXC3 Tutorials | ||
| | | Version = 3.0.0 | ||
| LinkBackwards = Lesson_2_Tut3 | |||
| TextBackwards = Lesson 2 | |||
| LinkForwards = Lesson_4_Tut3 | |||
| TextForwards = Lesson 4 | |||
}} | }} | ||
==Overview== | ==Overview== | ||
In this lesson we introduce the Project Explorer. This lesson helps you to understand how to create and patch your fixtures (devices) in DMXControl 3. We will also show you how groups of devices are created (automatically). | In this lesson we introduce the Project Explorer. This lesson helps you to understand how to create and patch your fixtures (devices) in DMXControl 3. We will also show you how groups of devices are created (automatically). | ||
==Lecture 3: Creating and patching fixtures== | ==Lecture 3: Creating and patching fixtures== | ||
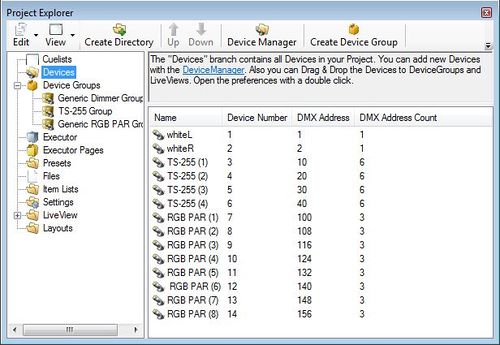
The starting point for adding devices is the '''project explorer''' (pic.1). Here you can find a tree of directories displaying the equipment and other items such as fixtures, devices, scene lists etc. These are controlled by context menus (right mouse click) or buttons, e.g. for adding or deleting items. | |||
The starting point for adding devices is the '''project explorer'''. Here | |||
Elements can also be moved by drag and drop or added to other elements. Whether an operation is allowed, is symbolized by the mouse icon. | Elements can also be moved by drag and drop or added to other elements. Whether an operation is allowed, is symbolized by the mouse icon. | ||
{{ | {{Manual Box | en | Hint | The project explorer is the central project tree containing all elements of your project. It is primarily intended to create and browse your items. For usage in the show programming, you would use "stage view" and other tools. | ||
| | |||
}} | }} | ||
{{Picture_with_subtitle|DMXC3L03 projectExplorer.JPG|1|The project explorer|center|500px}} | |||
==Add Devices== | |||
As an example, in the following step we will create 4 moving lights of type "TS-255". | |||
Click either on the button '''Device Manager''' in the menu bar of the Project Explorer or choose in the left pane of the Project Explorer the folder '''Devices''' and do a right mouse click into the right pane and select '''device manager''' (pic.2). | |||
Select your devices and fill in the requested data. Please pay attention to define the correct start addresses. Fill out the fields in the window named "Add new device" as follows; | |||
* Number of Devices; 4 | |||
Click either on the button '''Device Manager''' in the menu bar of the Project Explorer or choose in the left pane of the Project Explorer the folder '''Devices''' and do a right mouse click into the right pane and select '''device manager'''. | * Device Name; TS-255 | ||
Select your devices and fill in the requested data. Please pay attention to define the correct start addresses. | * DMX Start Address; 200 | ||
* DMX Space; 4 | |||
* Select the check-box marked "Autogenerate Group". | |||
* Group Name; TS-255 Group 2 | |||
* Repeat; 1 | |||
{{Picture_with_subtitle|DMXC3L03 createDevice.JPG|2|The device manager, create device|center|650px}} | |||
===Device Groups=== | ===Device Groups=== | ||
By setting the | By setting the check mark for "Autogenerate Group" a group element is created automatically containing all devices of this definition step. | ||
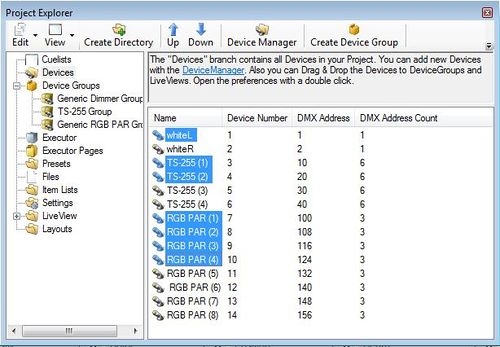
You can also create "user defined groups". Therefore you have to select the devices (e.g. in '''project explorer''' or in '''Stage View''') and press the "Create Device Group" button. Renaming of groups (and other items) also can be made within the project explorer. | You can also create "user defined groups". Therefore you have to select the devices (e.g. in '''project explorer''' or in '''Stage View''') and press the "Create Device Group" button. Renaming of groups (and other items) also can be made within the project explorer (pic.3). | ||
<br> | |||
{{Picture_with_subtitle|DMXC3L03 createDeviceGroup.JPG|3|Create device groups|center|500px}} | |||
When you do a right mouse click on an item the property menu appears. Here you can set additional properties such as "device id", "enabled flag" etc. | When you do a right mouse click on an item the property menu appears. Here you can set additional properties such as "device id", "enabled flag" etc. | ||
In the '''Project Explorer''' you can also rename items by two single clicks on the name or the context menu. | In the '''Project Explorer''' you can also rename items by two single clicks on the name or choose ''rename'' in the context menu (right mouse click). | ||
==Exercise== | ==Exercise== | ||
1) Create all devices as shown in the figure above: 4 TS-255, 2 generic dimmer (as front lights) and 8 RGB-PARs | |||
<br> | |||
2) Create two additional groups: all devices on left hand side and all devices on right hand side, rename these groups to "left" and "right" | |||
[[de:Lektion_3_Tut3]] | [[de:Lektion_3_Tut3]] | ||
[[ | [[Category: Tutorials DMXControl 3]] | ||
Latest revision as of 12:03, 2 March 2025
</onlyinclude>
|}
Overview
In this lesson we introduce the Project Explorer. This lesson helps you to understand how to create and patch your fixtures (devices) in DMXControl 3. We will also show you how groups of devices are created (automatically).
Lecture 3: Creating and patching fixtures
The starting point for adding devices is the project explorer (pic.1). Here you can find a tree of directories displaying the equipment and other items such as fixtures, devices, scene lists etc. These are controlled by context menus (right mouse click) or buttons, e.g. for adding or deleting items.
Elements can also be moved by drag and drop or added to other elements. Whether an operation is allowed, is symbolized by the mouse icon.
| The project explorer is the central project tree containing all elements of your project. It is primarily intended to create and browse your items. For usage in the show programming, you would use "stage view" and other tools. |

|
| Figure 1: The project explorer |
Add Devices
As an example, in the following step we will create 4 moving lights of type "TS-255".
Click either on the button Device Manager in the menu bar of the Project Explorer or choose in the left pane of the Project Explorer the folder Devices and do a right mouse click into the right pane and select device manager (pic.2). Select your devices and fill in the requested data. Please pay attention to define the correct start addresses. Fill out the fields in the window named "Add new device" as follows;
- Number of Devices; 4
- Device Name; TS-255
- DMX Start Address; 200
- DMX Space; 4
- Select the check-box marked "Autogenerate Group".
- Group Name; TS-255 Group 2
- Repeat; 1

|
| Figure 2: The device manager, create device |
Device Groups
By setting the check mark for "Autogenerate Group" a group element is created automatically containing all devices of this definition step.
You can also create "user defined groups". Therefore you have to select the devices (e.g. in project explorer or in Stage View) and press the "Create Device Group" button. Renaming of groups (and other items) also can be made within the project explorer (pic.3).

|
| Figure 3: Create device groups |
When you do a right mouse click on an item the property menu appears. Here you can set additional properties such as "device id", "enabled flag" etc.
In the Project Explorer you can also rename items by two single clicks on the name or choose rename in the context menu (right mouse click).
Exercise
1) Create all devices as shown in the figure above: 4 TS-255, 2 generic dimmer (as front lights) and 8 RGB-PARs
2) Create two additional groups: all devices on left hand side and all devices on right hand side, rename these groups to "left" and "right"
