m (Jkuehn moved page Lesson 22 to Lesson 22 Tut3 without leaving a redirect) |
No edit summary |
||
| (9 intermediate revisions by 5 users not shown) | |||
| Line 1: | Line 1: | ||
{{ | {{Manual Header | ||
| | | Type = DMXC3 Tutorials | ||
| | | Version = 3.0.0 | ||
| LinkBackwards = Lesson_21_Tut3 | |||
| TextBackwards = Lesson 21 | |||
| LinkForwards = Lesson_23_Tut3 | |||
| TextForwards = Lesson 23 | |||
}} | }} | ||
==Overview== | ==Overview== | ||
In this lesson, we explain the so-called input assignment. This allows external signals such as DMX-in for control of DMXControl 3. | In this lesson, we explain the so-called input assignment. This allows external signals such as DMX-in for control of DMXControl 3. | ||
= | == Lesson 22: Input Assignment == | ||
By means of '''Input Assignment''' external signals such as DMX-in can be used for control of DMXControl 3. This function is similar to the DMX In / MIDI remote control of DMXControl 2. | By means of '''Input Assignment''' external signals such as DMX-in can be used for control of DMXControl 3. This function is similar to the DMX In / MIDI remote control of DMXControl 2. | ||
You find this tool here: | You find this tool here: '''Settings -> Application Settings -> Input Assignment''' | ||
Settings -> Application Settings -> Input Assignment | |||
You can simply drag and drop the available inputs on the left side to the logical channels and control structures on the right side. | |||
{{Picture_with_subtitle |DMXC3L21_InputAssignment.JPG|1|Input Assignment Window|center|600px}} | |||
In the above example, the two front lights (white lights - generic dimmer) were associated with DMX-IN channel 1 and 2, so you can use an external board to control this dimmer channels. For another example shown above, the manual beat was associated with the first cuelist. | |||
==Exercise== | |||
1) Perform the above example with your own project (assignment of the first two channels of DMX-In) | |||
[[de:Lektion_22_Tut3]] | |||
[[Category: Tutorials DMXControl 3]] | |||
[[ | |||
Latest revision as of 12:03, 2 March 2025
</onlyinclude>
|}
Overview
In this lesson, we explain the so-called input assignment. This allows external signals such as DMX-in for control of DMXControl 3.
Lesson 22: Input Assignment
By means of Input Assignment external signals such as DMX-in can be used for control of DMXControl 3. This function is similar to the DMX In / MIDI remote control of DMXControl 2.
You find this tool here: Settings -> Application Settings -> Input Assignment
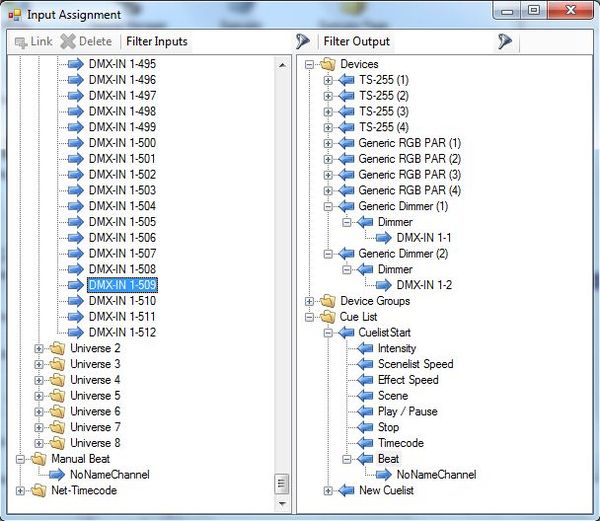
You can simply drag and drop the available inputs on the left side to the logical channels and control structures on the right side.

|
| Figure 1: Input Assignment Window |
In the above example, the two front lights (white lights - generic dimmer) were associated with DMX-IN channel 1 and 2, so you can use an external board to control this dimmer channels. For another example shown above, the manual beat was associated with the first cuelist.
Exercise
1) Perform the above example with your own project (assignment of the first two channels of DMX-In)
