No edit summary |
No edit summary |
||
| (5 intermediate revisions by 4 users not shown) | |||
| Line 1: | Line 1: | ||
{{ | {{Manual Header | ||
| | | Type = DMXC3 Tutorials | ||
| | | Version = 3.0.0 | ||
| LinkBackwards = Lesson_23_Tut3 | | LinkBackwards = Lesson_23_Tut3 | ||
| TextBackwards = Lesson 23 | | TextBackwards = Lesson 23 | ||
| Line 13: | Line 11: | ||
== Lesson24: Transferring DMX values over Artnet to DMXControl 2 == | == Lesson24: Transferring DMX values over Artnet to DMXControl 2 == | ||
{{ | {{Manual Box | en | Hint | This lesson works in if you are using Win 7. Win 8 has more problems, but it is possible to make it work. | ||
| | |||
}} | }} | ||
| Line 22: | Line 19: | ||
We start with the configuration of DMXControl 2 for receiving ArtNet data. For this, we choose in the taskbar of DMXControl 2 '''Configuration -> Output Plugins ...'''. We go to the output plugin dialog in which we configure the "ArtNet Plugin" by clicking "Configure Selected Plugin": | We start with the configuration of DMXControl 2 for receiving ArtNet data. For this, we choose in the taskbar of DMXControl 2 '''Configuration -> Output Plugins ...'''. We go to the output plugin dialog in which we configure the "ArtNet Plugin" by clicking "Configure Selected Plugin": | ||
{{ | {{Picture_with_subtitle |2.12_Ausgabeplugin_Konfiguration.PNG|1|ArtNet-plugin configuration in DMXControl 2|center|400px}} | ||
| Line 31: | Line 28: | ||
Close the window by clicking OK and activate the output plugin by checking the box in front of the name of the interface: | Close the window by clicking OK and activate the output plugin by checking the box in front of the name of the interface: | ||
{{ | {{Picture_with_subtitle |2.12_Ausgabeplugin.PNG|2|Output plugins window in DMXControl 2|center|400px}} | ||
DMXControl 2 is now ready to receive ArtNet data. In the next step we need to configure DMXControl 3 to send its DMX output via Artnet. At '''Settings--> DMX Interfaces''' we find the output plugins of DMXControl 3: | DMXControl 2 is now ready to receive ArtNet data. In the next step we need to configure DMXControl 3 to send its DMX output via Artnet. At '''Settings--> DMX Interfaces''' we find the output plugins of DMXControl 3: | ||
{{ | {{Picture_with_subtitle |3.0_Ausgabeplugin.PNG|3|Interface Panel DMXControl 3|center|600px}} | ||
With '''Add Interface ...'''we now select the ArtNet plugin: | With '''Add Interface ...'''we now select the ArtNet plugin: | ||
{{ | {{Picture_with_subtitle |Art-Net_auswählen.PNG|4|Adding the ArtNet Interface DMXControl 3|center|350px}} | ||
| Line 47: | Line 44: | ||
Here we need to select the IP address of our computer, which is typically located in the same network as the computer with our DMXControl 2 installation: | Here we need to select the IP address of our computer, which is typically located in the same network as the computer with our DMXControl 2 installation: | ||
{{ | {{Picture_with_subtitle |Adresse_auswählen.png|5|Configuration of ArtNet Interface DMXControl 3|center|400px}} | ||
If you start in DMXControl 2 and go to the DMX remote control (Window -> DMXin remote control) then change a value in '''Channel Overview''' of DMXControl 3, it should be displayed on the DMXin remote control: | If you start in DMXControl 2 and go to the DMX remote control (Window -> DMXin remote control) then change a value in '''Channel Overview''' of DMXControl 3, it should be displayed on the DMXin remote control: | ||
{{ | {{Picture_with_subtitle |ErsterArtNetTest.PNG|6|Test the connection DMXControl3 -> DMXControl 2|center|450px}} | ||
This window must remain open to continue operating! | This window must remain open to continue operating! | ||
Now we just need to patch the DMXin remote control of DMXControl 2 properly. If you go to '''Configuration -> DMXin Remote control ...''' we get the configuration screen: | Now we just need to patch the DMXin remote control of DMXControl 2 properly. If you go to '''Configuration -> DMXin Remote control ...''' we get the configuration screen: | ||
{{ | {{Picture_with_subtitle |2_12DMXIn-Konfig.png|7|Open the DMX-In remote control DMXControl 2|center|300px}} | ||
Here you can now control commands in DMXControl 2. First of all, we would like to patch all channels from ArtNet input in DMXControl 2 to DMX output. For this, we click at the right, in the still empty soft patch list '''1:1''': | Here you can now control commands in DMXControl 2. First of all, we would like to patch all channels from ArtNet input in DMXControl 2 to DMX output. For this, we click at the right, in the still empty soft patch list '''1:1''': | ||
{{ | {{Picture_with_subtitle |Softpatch212.PNG|8|Softpatch configuration DMXControl 2|center|600px}} | ||
In the following dialogues, we select the desired range of values. I decided to patch the entire DMX universe: | In the following dialogues, we select the desired range of values. I decided to patch the entire DMX universe: | ||
{{ | {{Picture_with_subtitle |1zu1Patch212.PNG|9|Softpatch von Start-DMX-Adresse bis End-DMX-Adresse DMXControl 2|center|600px}} | ||
{{ | {{Picture_with_subtitle |Softpatch212fertig.PNG|10|Softpatch in DMXControl 2|center|600px}} | ||
By clicking on'' 'OK''' now we have to activate the DMXin remote control: | By clicking on'' 'OK''' now we have to activate the DMXin remote control: | ||
{{ | {{Picture_with_subtitle |DMXIn_Aktivieren212.png|11|Activating the DMXIn remote control DMXControl 2|center|600px}} | ||
Now all values of DMXin are directly sent to the DMXOut interface. | Now all values of DMXin are directly sent to the DMXOut interface. | ||
| Line 88: | Line 84: | ||
==Exercise== | ==Exercise== | ||
1) Configure the connection between DMXControl 3 and DMXControl 2 | 1) Configure the connection between DMXControl 3 and DMXControl 2 | ||
<br> | |||
2) Test the color gradient example mentioned above | 2) Test the color gradient example mentioned above | ||
[[de:Lektion_24_Tut3]] | [[de:Lektion_24_Tut3]] | ||
[[Category: Tutorials DMXControl 3]] | [[Category: Tutorials DMXControl 3]] | ||
Latest revision as of 20:00, 2 March 2025
</onlyinclude>
|}
Overview
In this lesson we look at how we can combine the advantages of DMXControl release 3, with those of release 2, by connecting the tools via ArtNet.
Lesson24: Transferring DMX values over Artnet to DMXControl 2
| This lesson works in if you are using Win 7. Win 8 has more problems, but it is possible to make it work. |
Since DMXControl 3 still is in an early stage, some functions of the series 2 do not yet exist. This will be improved in the future, but it will take some time before all the functions of the series 2 are present. Nevertheless, we do not want to miss the advantages when using release 3. This section shows how a connection can be made from DMXControl 3 to DMXControl 2 via ArtNet.
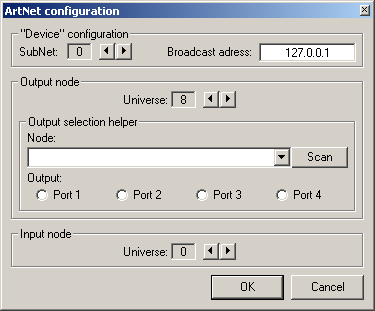
We start with the configuration of DMXControl 2 for receiving ArtNet data. For this, we choose in the taskbar of DMXControl 2 Configuration -> Output Plugins .... We go to the output plugin dialog in which we configure the "ArtNet Plugin" by clicking "Configure Selected Plugin":
|
| Figure 1: ArtNet-plugin configuration in DMXControl 2 |
Important here are the settings SubNet and for input node the Universe. We will configure DMXControl 3 in this way, so that it transmits our desired values in the subnet 0 in the universe 0.
The setting 'Universe in output node does not matter, and can (if required) be freely selected. But it must differ from the 'Universe of the input node, otherwise we get (in this configuration), a feedback loop, and DMXControl is no longer operable. In our configuration, the universe 8 is the next free universe.
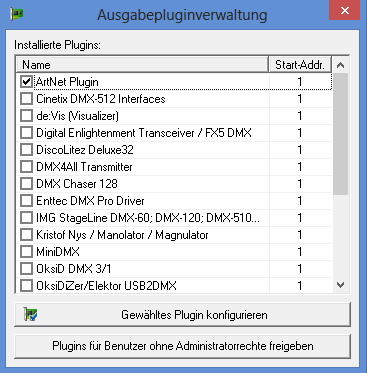
Close the window by clicking OK and activate the output plugin by checking the box in front of the name of the interface:
|
| Figure 2: Output plugins window in DMXControl 2 |
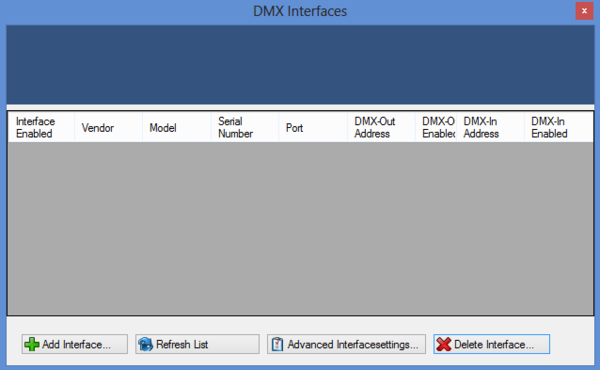
DMXControl 2 is now ready to receive ArtNet data. In the next step we need to configure DMXControl 3 to send its DMX output via Artnet. At Settings--> DMX Interfaces we find the output plugins of DMXControl 3:
|
| Figure 3: Interface Panel DMXControl 3 |
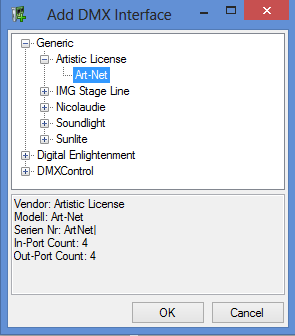
With Add Interface ...we now select the ArtNet plugin:
|
| Figure 4: Adding the ArtNet Interface DMXControl 3 |
In simple configurations the ArtNet transmitter is now running. But to be sure, configure the ArtNet plugin still on the correct network interface. By clicking on Advanced Interface Settings ... we come to the configuration dialog. We are interested in the binding to entry.
Here we need to select the IP address of our computer, which is typically located in the same network as the computer with our DMXControl 2 installation:

|
| Figure 5: Configuration of ArtNet Interface DMXControl 3 |
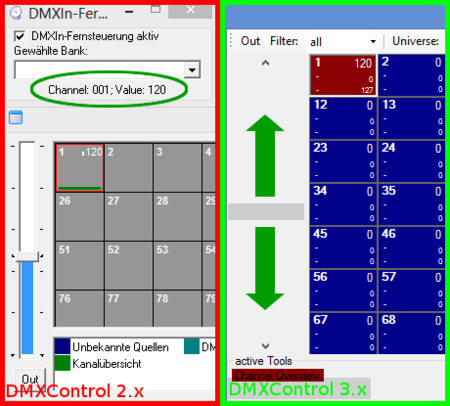
If you start in DMXControl 2 and go to the DMX remote control (Window -> DMXin remote control) then change a value in Channel Overview of DMXControl 3, it should be displayed on the DMXin remote control:
|
| Figure 6: Test the connection DMXControl3 -> DMXControl 2 |
This window must remain open to continue operating!
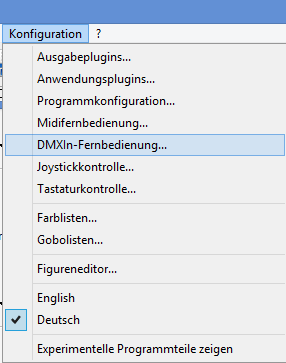
Now we just need to patch the DMXin remote control of DMXControl 2 properly. If you go to Configuration -> DMXin Remote control ... we get the configuration screen:
|
| Figure 7: Open the DMX-In remote control DMXControl 2 |
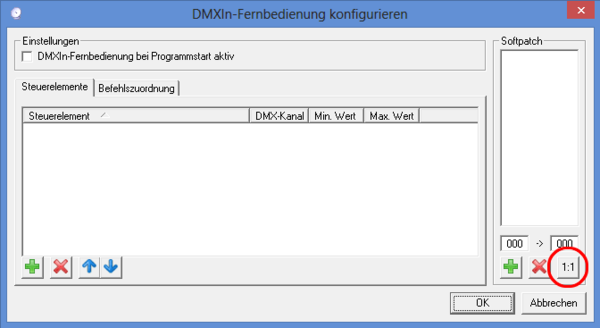
Here you can now control commands in DMXControl 2. First of all, we would like to patch all channels from ArtNet input in DMXControl 2 to DMX output. For this, we click at the right, in the still empty soft patch list 1:1:
|
| Figure 8: Softpatch configuration DMXControl 2 |
In the following dialogues, we select the desired range of values. I decided to patch the entire DMX universe:

|
| Figure 9: Softpatch von Start-DMX-Adresse bis End-DMX-Adresse DMXControl 2 |
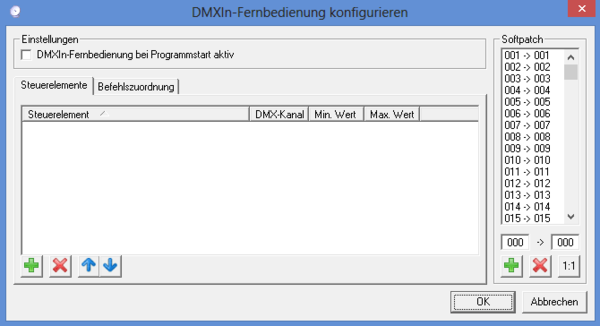
|
| Figure 10: Softpatch in DMXControl 2 |
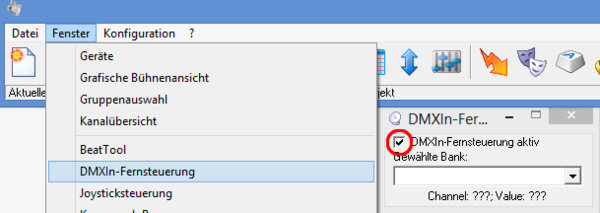
By clicking on 'OK' now we have to activate the DMXin remote control:
|
| Figure 11: Activating the DMXIn remote control DMXControl 2 |
Now all values of DMXin are directly sent to the DMXOut interface.
You can test the connection by sending color gradient from DMXControl 3 to DMXControl 2. With this workaround, we extend the functionality of DMXControl 2 with features from DMXControl 3.
Error handling
If no DMXin values from the remote control are shown, there is still a fault with the network configuration. Please check the following points:
- Are the computers in the same network? Can the computers ping each other?
- Switch off firewalls (for test only), because the often block UDP data (ArtNet is based on UDP)
- Are both DMXControl plug-ins configured on the same subnet?
- Is DMXControl 2 configured for the same universe as a receiver, on which DMXControl 3 sends data?
- No other sender configured in this universe?
Exercise
1) Configure the connection between DMXControl 3 and DMXControl 2
2) Test the color gradient example mentioned above
