Difference between revisions of "Lesson 11 Tut3"
| (22 intermediate revisions by 8 users not shown) | |||
| Line 1: | Line 1: | ||
| − | + | {{Maintitle | |
| − | + | | logo = Im-aim.png | |
| − | + | | maintitle = First Steps: {{PAGENAME}} | |
| − | + | }} | |
| − | + | {{NavigationTop-Tut3 | |
| − | + | | LinkBackwards = Lesson_10_Tut3 | |
| − | + | | TextBackwards = Lesson 10 | |
| + | | LinkForwards = Lesson_12_Tut3 | ||
| + | | TextForwards = Lesson 12 | ||
| + | }} | ||
==Overview== | ==Overview== | ||
| − | + | Cue lists are the best tool to control the flow of your show. In this lesson we explain how to define the sequence and the change of scenes by triggers. | |
| − | ==Lecture 11: | + | ==Lecture 11: Triggers in cue lists == |
| + | In previous lessons we learned how to create cues and scene lists. Now that you are familiar with most of the attributes of the scene list, more explanation about triggers is necessary. A trigger is an event that causes a previously saved scene to start. A trigger might come from things like a button press by the user,or an internal timer. The default trigger is "follow". This means the next cue will be started after the previous one has finished fading in. | ||
| − | + | '''Important:''' When you change the trigger type, you need to apply the changes with the enter-key or by clicking in another field. | |
| − | + | There are several types of triggers. The following table describes their behaviors. | |
| − | + | {{Picture_with_subtitle|DMXC3L11 trigger.jpg|1|Accepted triggers|center}} | |
| − | |||
| − | |||
{| class="wikitable" | {| class="wikitable" | ||
|- | |- | ||
| − | ! Type | + | ! Type !! Example format !! Description |
|- | |- | ||
| − | | | + | | manual || (optional) 3 || Use GO to fade in next cue. |
| + | Optional: Fade cue in after 3 GO presses. The default is 1. | ||
|- | |- | ||
| − | | | + | | follow || 5s || Wait until the previous cue is faded in, then wait 5 seconds before starting the next cue. |
|- | |- | ||
| − | | | + | | wait || 5s || Wait time countdown starts when the wait or follow of the previous cue is completed. In other words, the cue will wait 5 seconds after the prior cue has started, rather than waiting for it to finish. |
|- | |- | ||
| − | | | + | | timecode || 00:26:05 || Waits for the DMXControl to be given an external timecode signal equal to 00:26:05. |
|- | |- | ||
| − | | | + | | rtc || 13:00:00 || Real time clock. Fade in a cue at the specified time of 1 pm. |
| + | |- | ||
| + | | beat || (optional) 3 || This requires more settings. See the paragraph below. | ||
| + | Optional: Fade in cue after 3 beats. The default is 1. | ||
|} | |} | ||
| + | {{BoxHint | ||
| + | |Text= Type in combined time information without "blank" characters, e.g. 1m20s | ||
| + | }} | ||
| − | + | If you type an incorrect format into the '''trigger value''' field, you will get some hints about the expected input syntax. See the example below for the "follow" type. | |
| − | + | {{Picture_with_subtitle|DMXC3L11 triggerhelpcontextfollow.JPG|2|View of Trigger Value help context|center}} | |
| − | |||
| − | + | Below is the example for the real time clock selection. | |
| + | {{Picture_with_subtitle|DMXC3L11 triggerhelpcontext.JPG|3|View of Trigger Value help context|center}} | ||
| − | + | Currently only the time code from Digital Enlightenment Mediacenter [http://www.digital-enlightenment.de/mediacenter.htm] is supported. Support for other time codes will be created in the future. | |
| − | + | ===Use of beat trigger=== | |
| + | A '''Beat Trigger''' is a trigger based on the main rhythm of the music. It may be manually set, or automatically generated by DMXControl as it analyzes an audio signal and looks for peak transients. | ||
| − | + | If you want to have your scenes beat controlled, you need to select the source for the trigger '''beat''' . | |
| − | ''' | + | {{BoxHint|Text=In the '''Trigger''' field you can specify after how many beat signals the next cue is called |
| − | + | }} | |
| − | + | {{Picture_with_subtitle |Beattrigger.PNG|4|Example for beattrigger|center}} | |
| − | |||
| − | + | Now you have to inform the '''Cue List''' which source of the beat signal should be used (manual beat/audioanalyzer....) | |
| − | + | Therefore you have to assign an input in the [[Lesson_22_Tut3|'''Input Assignment''']] via drag&drop to the beat entry of the cue list (see linked Lesson 22 "Input Assignment" for further details!). | |
| − | + | {{Picture_with_subtitle |DMXC3_L11_InputassignmentBeat.png|5|Input Assignment|center}} | |
| − | == | + | ==Summary== |
| − | + | The following figure shows the dependencies and capabilities of mixing several trigger types: | |
| − | + | {{Picture_with_subtitle|DMXC3L11 SlideDMXC3Trigger.jpg|6|Overview of possible trigger functions|center|600px}} | |
| − | |||
| − | |||
| − | |||
| − | |||
| − | |||
| − | |||
| − | |||
| − | |||
| − | |||
| − | |||
| − | |||
| − | |||
| + | * Each cue has its own delay-time (before the fade-in start) - delay1 to delay3 | ||
| + | * Cue2 has a follow-trigger of 1s. It starts 1 second after the fade-in of the previous cue is completed | ||
| + | * Cue3 has a wait-trigger, but 0s. Thus cue3 starts immediately after the previous scene is finished. | ||
| + | * Cue4 also has a wait-trigger (1s). So it will wait for 1s after the wait (0s) of the previous scene is finished. | ||
| + | ==Exercises== | ||
| + | * Test a mix of "follow" and "wait" triggers in one scene list | ||
| + | <br> | ||
| + | * Use a tool providing time codes, such as MediaCenter, and test a scene list that is completely based on time codes | ||
| − | + | {{NavigationTop-Tut3 | |
| − | {{ | + | | LinkBackwards = Lesson_10_Tut3 |
| + | | TextBackwards = Lesson 10 | ||
| + | | LinkForwards = Lesson_12_Tut3 | ||
| + | | TextForwards = Lesson 12 | ||
| + | }} | ||
| + | [[de:Lektion_11_Tut3]] | ||
| + | [[Category: Tutorials DMXControl 3]] | ||
Latest revision as of 23:41, 15 May 2013
| [[File:{{{Logo}}}|48px|link=]] | {{{Pagetitle}}} |
Contents
Overview
Cue lists are the best tool to control the flow of your show. In this lesson we explain how to define the sequence and the change of scenes by triggers.
Lecture 11: Triggers in cue lists
In previous lessons we learned how to create cues and scene lists. Now that you are familiar with most of the attributes of the scene list, more explanation about triggers is necessary. A trigger is an event that causes a previously saved scene to start. A trigger might come from things like a button press by the user,or an internal timer. The default trigger is "follow". This means the next cue will be started after the previous one has finished fading in.
Important: When you change the trigger type, you need to apply the changes with the enter-key or by clicking in another field.
There are several types of triggers. The following table describes their behaviors.

|
| Picture 1: Accepted triggers |
| Type | Example format | Description |
|---|---|---|
| manual | (optional) 3 | Use GO to fade in next cue.
Optional: Fade cue in after 3 GO presses. The default is 1. |
| follow | 5s | Wait until the previous cue is faded in, then wait 5 seconds before starting the next cue. |
| wait | 5s | Wait time countdown starts when the wait or follow of the previous cue is completed. In other words, the cue will wait 5 seconds after the prior cue has started, rather than waiting for it to finish. |
| timecode | 00:26:05 | Waits for the DMXControl to be given an external timecode signal equal to 00:26:05. |
| rtc | 13:00:00 | Real time clock. Fade in a cue at the specified time of 1 pm. |
| beat | (optional) 3 | This requires more settings. See the paragraph below.
Optional: Fade in cue after 3 beats. The default is 1. |
| |
Type in combined time information without "blank" characters, e.g. 1m20s |
If you type an incorrect format into the trigger value field, you will get some hints about the expected input syntax. See the example below for the "follow" type.

|
| Picture 2: View of Trigger Value help context |
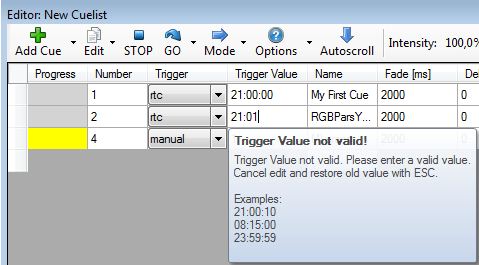
Below is the example for the real time clock selection.

|
| Picture 3: View of Trigger Value help context |
Currently only the time code from Digital Enlightenment Mediacenter [1] is supported. Support for other time codes will be created in the future.
Use of beat trigger
A Beat Trigger is a trigger based on the main rhythm of the music. It may be manually set, or automatically generated by DMXControl as it analyzes an audio signal and looks for peak transients.
If you want to have your scenes beat controlled, you need to select the source for the trigger beat .
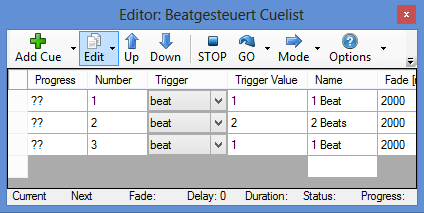
| |
In the Trigger field you can specify after how many beat signals the next cue is called |

|
| Picture 4: Example for beattrigger |
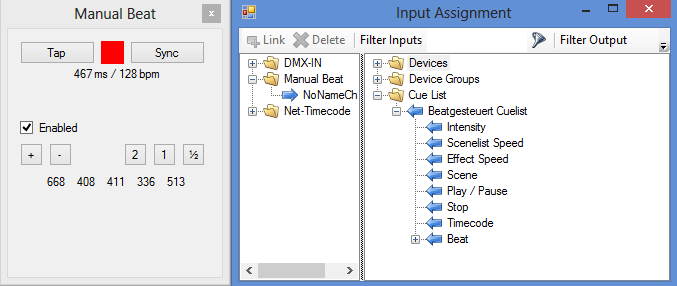
Now you have to inform the Cue List which source of the beat signal should be used (manual beat/audioanalyzer....)
Therefore you have to assign an input in the Input Assignment via drag&drop to the beat entry of the cue list (see linked Lesson 22 "Input Assignment" for further details!).

|
| Picture 5: Input Assignment |
Summary
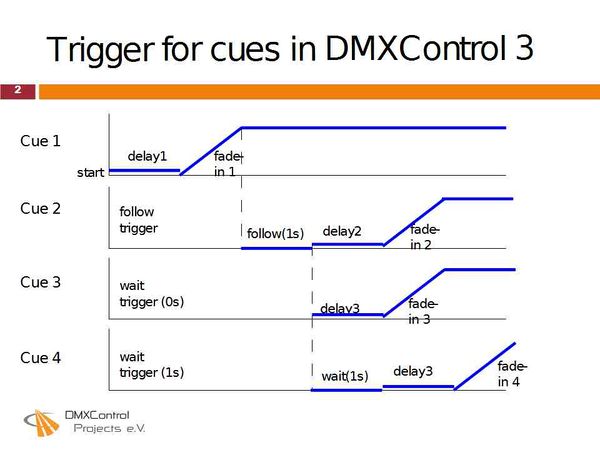
The following figure shows the dependencies and capabilities of mixing several trigger types:

|
| Picture 6: Overview of possible trigger functions |
- Each cue has its own delay-time (before the fade-in start) - delay1 to delay3
- Cue2 has a follow-trigger of 1s. It starts 1 second after the fade-in of the previous cue is completed
- Cue3 has a wait-trigger, but 0s. Thus cue3 starts immediately after the previous scene is finished.
- Cue4 also has a wait-trigger (1s). So it will wait for 1s after the wait (0s) of the previous scene is finished.
Exercises
- Test a mix of "follow" and "wait" triggers in one scene list
- Use a tool providing time codes, such as MediaCenter, and test a scene list that is completely based on time codes
| |||||||||||||