No edit summary |
No edit summary |
||
| Line 134: | Line 134: | ||
===Cue konfiguration=== | ===Cue konfiguration=== | ||
{{Picture_with_subtitle | | {{Picture_with_subtitle |DMXC2_Manual_chaser_tool_step.png|5|Step setting|right|200px}} | ||
If a new step towards an effect was made, then this can be configured in the entry field "'''step'''". (see figure 5) | |||
Die Erstellung von Szenen wird ausführlich im [[Szenen_DMXC2|Kapitel 9 Szenen]] erklärt. | Die Erstellung von Szenen wird ausführlich im [[Szenen_DMXC2|Kapitel 9 Szenen]] erklärt. | ||
The construction of cues is explained in detail in the [[Szenen_DMXC2|chapter 9 cues]]. | |||
* | * The meaningful name of the step can be described in the entry field "'''step name'''" or afterwards also at selected step be changed. | ||
* | * With the checking box "'''active voice'''" one can decide worked off in the effect whether the step is. | ||
* | * The one fade time of the select cue can be determined in the entry field "'''one fade time'''". | ||
* | * In the entry field "'''hold time'''" (in the scene list as a duration described) the time can, the scene lasts before be this one is switched to the next step adjusted. | ||
{{BoxHint | {{BoxHint | ||
| Text = | | Text = The entry fields at the one fade time and hold time (duration) stand for on the right to the left for seconds, seconds and minutes. | ||
}} | }} | ||
Revision as of 11:48, 26 October 2013
| This section is actively undergoing a major edit for a while. To help avoid edit conflicts, please do not edit this section while this message is displayed or contact the editor (Steiny) of this page. | This page was last edited at 11:48, 26 October 2013 (UTC) 4486 days ago. |
Hint:
25.5.2013: UPrenner: create the article page
25.10.2013 UPrenner: work-in-progress
Overview
One can have with this tool to make effects and to go off. An effect represents an expiry of scenes which can be changed in the order, speed, Sound2Light etc. , though. An effect also stands for
- a coherent light game of a different devices (e. g. interplay two color change machines),
- a functional expiry of a device (the course of the DMX values) describes a function
- particularly concise activities (e. g. stroboscope effect)
Several effects can be started parallel.
| |
An effect in DMXControl corresponds to the concept Chaser from other programs. An effect of the effect of one is similar, [cue_list_DMXC2 |
Description
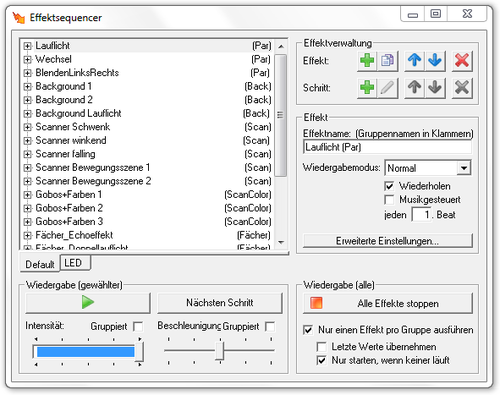
All effects of a project are represented by a tree structure in DMXControl. Every effect contains arbitrarily many steps (single scenes).
|
| Figure 1: Der Effektsequencer |
Effects and steps can arbitrarily be copied or deleted, moved, hinzugefügtt. Of course the individual scenes also can be chosen from the scene library. Steps can be defined also as an order, audio scene or movement scene.
Controls
The view is in the left upper part of the Effektsequencer window with the tree structure of all effects. The individual steps can be (see figure 1) one or hiddenly with the +/- node.
Effect-administration
| |||
|
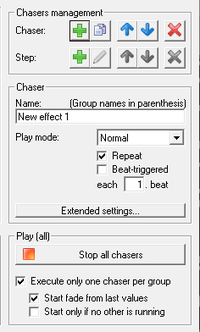
On the one hand, in the area of effect administration (see figure 2) can by the button « Add » new effects made, existing effects with the button « Copy » copyed or with the button « Delete » being deleted. Furthermore the possibility passes the effects by means of the button « arrow high » and « arrow down « moving in the list.
Apart from the effect construction, the cues contained in the stock exchange securities (steps) also can be made, processed or deleted here. In addition, the cues can be moved within the effect. (see figure 2)
Effect
If a new effect is made, he can in the area « Effect » being configured. The effect should be assigned to here in the area of effect name, a meaningful name. The account mode also can be adjusted as well as the Sound2Light mode activated in this area. Effects can as well here by input of a group name (group name in brackets) be grouped in a full bracket (see figure 3).
| |
No blanks may happen in the Gruppennamenklammer since otherwise DMXControl doesn't recognize the group names. An underscore can be used as a substitute for the blank. Effect names and group names must be a blank, otherwise the group isn't recognized. |
Effect-grouping
Mit der Effekt-Gruppierung können ähnliche Effekte zu Gruppen zusammengefasst werden, wobei ein Effekt auch in mehreren Gruppen gleichzeitig sein kann. Dazu werden alle Gruppennamen mit einem Semikolon getrennt in die Klammer geschrieben.
<Effectname>(<Group1>;<Group2>;<Group3>;...)
With several groups assigned to an effect the effect speed with the first group and the intensity is connected with the second group.
<Effectname>(<SpeedGRP>;<IntensityGRP>)
Shall an effect be assigned to several groups, the speed and the intensity, however, be assigned to the same group so the effect name must be typed in twice.
<Effectname>(<SpeedIntensGRP>;<SpeedIntensGRP>;<OtherGRP>;...)
Through this extended functions offer themselves at the effect control. With the option « Execute always only one chaser per group » you can reach that the active effect is ended in a group as soon as a new effect is started from the group. However, this action doesn't have influence on effects of other groups. With this function it can be prevented that several effects which influence the same equipment channels are active at the same time. Otherwise e. g. it can come to an unchecked version of the DMX values of the individual effects what at headlights to one flicker leads.
A typical application case is the separation from movement stock exchange securities and normal headlight stock exchange securities. The list of the effects then can for example look so:
Running_Light1(Speed;PAR)
Change_Indicator(Speed;PAR)
Everyone_Flash(Speed;PAR)
Scanner_In_Circle(Speed;Scanner)
Wild_Swivel(Speed;Scanner)
Quiet_Atmosphere(Speed;Scanner)
{{BoxImportant
|Text = The following points serve the attitude or the syntax of groupings
- The advertisement of the effect groups can program configuration in the [[be adjusted right justified.
- Behind the group name no broader signs should be entered. Blanks appended inadvertently make the grouping ineffectively or similar.
}}
Effect play mode
The dropdown « Play mode » if influences the account of the effect, gives this one to six modes selectly can be.
| Play mode | Description |
|---|---|
| Manual | The respectively next cue must be manually the next step actively at choice of manual, over the Button. |
| Normal | Become the cues of the row at choice of regular after worked off from above down. Is the checking box repeat actively, then is after processing of the last cue you start with the first one again. |
| Reverse | At choice of backward the scenes of the row are after worked off up from below. Is the checking box repeat actively, then is after processing of the first scene you start with the last one again. |
| Bounce | At choice of bounce the cues of the row are after worked off from above down. Is the checking box repeat actively, then is after processing of the last cue you work off from below up. |
| Random | At choice of random, be the cues worked off in a random order. |
| Only one step | The checking box Repeat is not actively if is a cue is executed at the effect list by chance and the effect deactivated after that. |
- The checking box & laquo; repeating & raquo; effect has started after expiry once more.
- Die Checkbox « Musikgesteuert » läßt die Szenen im Effekt abhängig von BeatTool bzw. vom Tap-Button weiterschalten.
- The checking box « music controlled » beat tool lets the cues in the effect depending of or of the Tap button.
Effect (extended settings)

|
| Figure 4: Effect extended settings |
At the click on the button « Extended settings » does the extended effect configuration field get visible. (see figure 4)
This configuration field offers extended attitudes towards the configuration of the effect.
- This provides at activation for it the checking box ignore global speed master the effect isn't influenced by the speed master in the module master.
- An entry field also is the dropdown button category. A new page tab can be produced (see figure 1 page tab LED) by the input of a new category namen here. When producing the first page tab, the page tab default also is produced per default. This page tab cannot be deleted. By the assignment the effects can be divided up on different page tabs. By assignment of an effect of category amen existing to one, this is assigned to the corresponding page tab and, later, also still can be changed or moved. If no more effect is assigned to a page tab, then the page tab is deleted automatically.
- A priority can be fixed in the entry field priority. Effects with a higher priority end effects with a lower priority. It the checking box "only a effect per group" was activated presupposed. Of zero the effect means this a priority no priority has.
- n the entry field repetitions one can repetitions determine after how many the effect shall be ended. Zero stands the value for an infinite repetition.
- With the two buttons Command define, one can call module-related orders at the start and when ending the scene on start and on stop.
| |
The advertisement of the effect groups can in the program stettings be adjusted right justified. |
Cue konfiguration

|
| Figure 5: Step setting |
If a new step towards an effect was made, then this can be configured in the entry field "step". (see figure 5)
Die Erstellung von Szenen wird ausführlich im Kapitel 9 Szenen erklärt. The construction of cues is explained in detail in the chapter 9 cues.
- The meaningful name of the step can be described in the entry field "step name" or afterwards also at selected step be changed.
- With the checking box "active voice" one can decide worked off in the effect whether the step is.
- The one fade time of the select cue can be determined in the entry field "one fade time".
- In the entry field "hold time" (in the scene list as a duration described) the time can, the scene lasts before be this one is switched to the next step adjusted.
| |
The entry fields at the one fade time and hold time (duration) stand for on the right to the left for seconds, seconds and minutes. |
Play
|
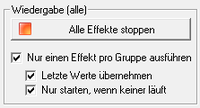
| Figure 6: Wiedergabe-Konfiguration |
Einstellungen für die Wiedergabe können im Effeksequencer Fenster in 2 Bereiche gemacht werden.
Wiedergabe (alle)
Unter Wiedergabe (alle) befindet sich die Konfigurationseinstellungen für die Wiedergabe bei allen Effekten (siehe Bild 6), zum anderen befindet sich hier der Button um alle laufenden Effekte zu stoppen (« Alle Effekte Stoppen »).
- Checkbox Nur einen Effekt pro Gruppe ausführen: Je nach Einstellung wird der gewählte Effekt zusätzlich gestartet oder er ersetzt alle laufenden Effekte (die dann beendet werden). Diese Eigenschaft bezieht sich auf alle Effekte.
- Checkbox Letze Werte übernehmen: Standardmäßig wird, nachdem ein Effekt abgearbeitet ist, zur Lichtstimmung gewechselt die vor dem Start des Effektes existierte. Das heißt beim Wechsel zwischen 2 Effekte wird der alte Effekt in den neuen umgewandelt, aber beim Beenden ist das Universe mit alten Werten belegt. Wenn die Checkbox markiert ist, werden die letzten Werte auf dem Universum belassen. Wichtig: Dies betrifft nur gruppierte Effekte wobei hier Geräte selbstverständlich auch wieder überschrieben werden wenn der neu gestartete Effekt diese Geräte ebenfalls verwendet.
- Checkbox Nur starten, wenn keiner läuft: Nur selektierbar wenn auch die Checkbox Nur einen Effekt pro Gruppe ausführen aktiv ist. Läuft in einer Gruppe bereits ein Effekt, so ist es nicht möglich einen anderen aus dieser Gruppe zu starten. Dafür muss zunächst der laufende Effekt beendet werden.
| |
Die Funktion Nur starten, wenn keiner läuft bedeutet nicht, dass nach dem Beenden des Effektes (bzw. eines anderen Effektes der Gruppe) die letzten Werte weiterhin ausgegeben werden! Alle Geräte kehren in den Stand zurück bevor der erste Effekt gestartet wurde. Um dies zu realisieren empfiehlt sich die Verwendung der Szenenliste. |
Wiedergabe (gewählter)
|
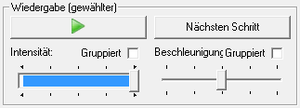
| Figure 7: Wiedergabe |
Die Einstellungen unter Wiedergabe (gewählter) gelten für den jeweils markierten Effekt in der Liste und werden für jeden Effekt gespeichert.
- Button « Play »: Mit diesem Button kann der in der Liste ausgewählte Effekt gestartet oder gestoppt werden. Der Button fungiert alternierend als Start/Stop Button.
- Button « Nächster Schritt »: Mit diesem Button kann ein Effekt der den Wiedergabemodus Manuell hat weitergeschaltet werden.
- Fader « Intensitäts »: Mit diesem Fader kan man die Helligkeit des angewählten Effekts in der Liste einstellen, sofern sich im Effekt ein Kanal mit dem Type: Dimmer befindet. (Type: Dimmer siehe Kapitel 32 DDF Grundlagen)
- Checkbox « Intensität-Gruppieren »: Durch die Checkbox, kann man, für die ausgewählten Effekte, die Intensität innerhalb der Gruppe gruppieren. D.h die ausgewählten Effekte einer Gruppe reagieren bei Aktivierung alle auf die Änderung der Intensität.
- Fader « Beschleunigungs »: Hier kann die Geschwindigkeit des Effekts beim Abspielens beeinflusst werden. Alle Schritte eines Effektes werden im gleichen Verhältnis beschleunigt oder gebremst.
- Checkbox « Beschleunigung-Gruppieren »: Durch die Checkbox, kann man, für die ausgewählten Effekte, die Beschleunigung innerhalb der Gruppe gruppieren. D.h die ausgewählten Effekte einer Gruppe reagieren bei Aktivierung alle auf die Änderung der Beschleunigung.
Nutzung von Effekten
Effekte können entweder direkt manuell aus dem Effektsequenzer gestartet werden oder in jegliche Formen von Szenenlisten (auch Audioplayer und Texttool) eingebettet werden. Dazu muss man aus dem Kontextmenü des den Menüpunkt « Befehl » auswählen. Ein einzelner Effekt wird z.B. mit den Befehlen Start und Stop aktiviert, es gibt z.B. auch einen Befehl um alle laufenden Effekte zu stoppen. Beispiel: Im Audioplayer kann man Effekte einbinden indem man auf Hinzufügen geht und dann den Menüeintrag « Befehl » auswählt.
Unter Modul dann Effekte. Dann unter Funktion den Effekt wählen den man vorher erstellt hat. Dann den ersten Marker Start da hinsetzen, wo der Effekt starten soll und Befehl Stop dort erstellen, wo der Effekt aufhören soll. Beim Start und Beenden von Effekten kann je ein Init- bzw. Finalizer-Befehl ausgeführt werden, welcher unter « erweiterte Effekteinstellungen » definiert werden kann.
| |
Bitte immer vorher versichern, dass der umzubenennende Effekt/Schritt auch wirklich selektiert ist. Manchmal kann es passieren, dass durch Öffnen/Schließen des Baumes die Markierung umspringt. Auch beim Erzeugen eines Effektes ist dieser noch nicht automatisch markiert. |
Modulbezogene Befehle
- Modul: Effekte
- Bedeutung von Gerät/Funktion und Kanal
| Gerät/Funktion | Beschreibung | Kanal | Beschreibung |
|---|---|---|---|
| Alle | Der Befehl wird auf alle Effekte angewand. | Stop | Alle laufenden Effekte werden gestopt. |
| Ausgewählter | Der weitere Befehl wird auf den aktuellen Effekt angewendet. Oberhalb einer Effektkategorie stehen, wenn Kategorien benutzt worden, die entsprechenden Kategorienamen. Diese können zwar ausgewählt werden, können aber keinem Befehl zugeordnet werden. |
Start/Stop | Der Befehl Start/Stop startet und stopt den ausgewählten Effekt für automatischen Ablauf. (Der Befehl sollte im Zusammenhang mit dem T-Flag eingesetzt werden.). |
| Start | Der Befehl Start startet den ausgewählten Effekt im Effektsequencer für automatischen Ablauf. | ||
| Stop | Der Befehl Stop stopt den ausgewählten Effekt im Effektsequencer für automatischen Ablauf. | ||
| Beschl. setzen | Mit diesem Befehl läßt sich die Effektbeschleunigung auf den in Wert eingegebenen Prozentwert setzen. | ||
| Intes. setzen | Mit diesem Befehl läßt sich die EffektIntensität auf den in Wert eingegebenen Prozentwert setzen. | ||
| Nächster Schritt | Führt bei Effekten, die auf Wiedergabemodus Nur ein Schritt eingestellt sind, den nächsten Schritt aus. | ||
| Wiederh. Ein/Aus | Schaltet die Option Wiederholen für den gewählten Effekt Ein/Aus. (T-Flag benutzen) siehe Hinweis | ||
| Musikgest. Ein/Aus | Schaltet die Option Musiksteuerung für den gewählten Effekt Ein/Aus. (T-Flag benutzen) siehe Hinweis | ||
| Nächst. Wiedergabemodus | Wählt den nächsten Wiedergabemodus für den gewählten Effekt aus. | ||
| Wiedergabemodus: * Manuell * Normal * Rückwärts * Hin und her * Zufällig * Nur ein Schritt |
Wählt den entsprechenden Wiedergabemodus für den gewählten Effekt aus. | ||
| Intens. mit Start/Stop | Der Befehl Intens. mit Start/Stop startet und stopt den ausgewählten Effekt für automatischen Ablauf, gleichzeitig kann über die Wertspalte ein Prozentwert für die Helligkeit mit übergeben werden. |
| Gerät/Funktion | Beschreibung | Kanal | Beschreibung |
|---|---|---|---|
| Nächster Vorheriger Sonstige Einträge |
Der weitere Befehl wird auf den aktuell nächsten, vorherigen oder im Dropdown benannte Effekt angewendet. | Auswählen | Wählt den nächsten, vorherigen bzw. die im Dropdown Gerät/Funktion benannten Effekt aus. |
| Start/Stop Start Stop Beschl. setzen Intes. setzen Nächster Schritt Wiederh. Ein/Aus Musikgest. Ein/Aus Wiedergabemodus Intens. mit Start/Stop |
siehe oben |
Bedeutung der Flags:
| Flag | Bedeutung | Beschreibung |
|---|---|---|
| T | Umschalt-Modus | Das Flag « Umschalt-Modus » bewirkt, dass die Funktion beim ersten Aufruf ausgeführt wird und beim zweiten Aufruf zurückgesetzt wird. |
| O | Angegebenen Wert verwenden | Das Flag « Angegebenen Wert verwenden » bewirkt, dass der Wert in der Spalte Wert dem entsprechenden Kanal zugeordnet wird. Dieser Wert ist kein DMX-Wert 0 bis 255, sondern ein Prozentwert 0,000 bis 100,000% |
| A | Wert Abfragen | Das Flag « Wert Abfragen » bewirkt, dass sich bei Aufruf des Befehls ein Eingabefenster öffnet, in dem der Prozentwert eingegeben werden kann. |
| I | Wert 0 ignorieren | Das Flag « Wert 0 ignorieren » bewirkt, dass ein Wert von Null ignoriert wird. Wird bei einigen Befehlen benötigt, um eine korrekte Funktion zu gewährleisten. |
Template unused
Tip(s)
Mit Effektgruppierung kann man z.B. folgenden Trick anwenden:
Man erstellt sich z.B. 3 verschiedene Scannerbewegungen. Dabei wird in jeder Szene NUR die Position gespeichert (Haken dran beim erstellen) und keine Helligkeit, Farbe, Gobo etc. Dann macht man genau das Gegenteil und programmiert nochmal 3 Effekte nur mit Farbwechsel. Bei Bedarf dann nochmal 3 nur mit Gobowechsel. Und schon kann man aus diesen 3x3 Effekten eine riesige Kombination zusammenstellen. Dafür nimmt man dann Startereffekte die nichts anderes beinhalten als die Befehle starte Bewegung1, starte Farbwechsel3, starte Gobowechsel2. Mit entsprechenden Haltezeiten ist so recht schnell eine Abfolge von automatischen Änderungen einprogrammiert.
Links und Referenzen
Tutorials
